UTENSILS AND MATERIALS
Before going into the details of the actual batik process it will perhaps be a good plan to give a description of the necessary tools and their management, wax, and various other essential requirements. The tools chiefly used, are the native instrument called the “tjanting,” the brush, and the European wax pencil. Of these three the tjanting and the brush are most generally used, the wax pencil being a somewhat clumsy affair and hard to handle.
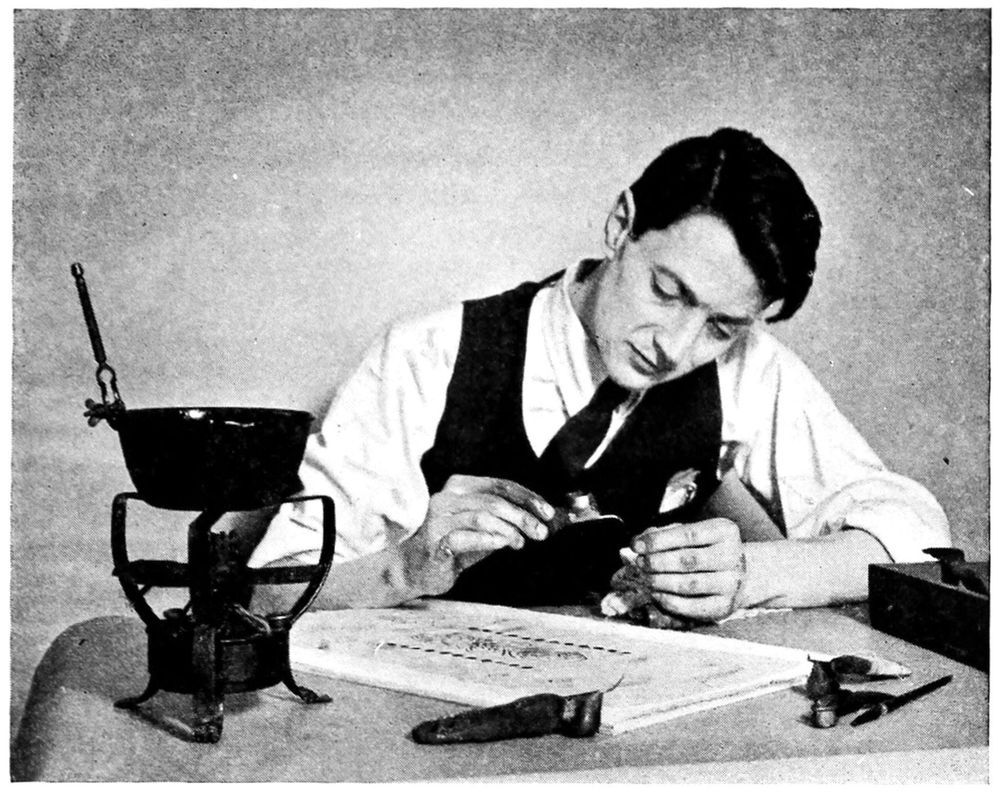
The “tjanting” used in America is a modification of the Javanese instrument; it is a little cup-shaped tool with a handle set at right-angles to the base on one side and on the other is a fine spout arrangement. Through this spout the hot wax is drawn by capillary attraction when the point is brought in contact with the material. In the best type of “tjanting” the spout is tapered toward the point; this shaping is in order that the volume of wax, small though it is, will hold the heat longer than if the entire length of the tube were as minute as the hole through which it is finally drawn.
In batiking with the tjanting the wax is scooped out of the pot in which it is being kept hot and the instrument is wiped off carefully before it is brought near the fabric. It does not do to take a chance on having a drop of wax fall on the work as it is next to impossible to remove it entirely. Some people hold their tjanting directly over a flame to re-heat cooling wax, but it is a very unwise practice as there is a grave danger of hurting the spout and a likelihood of the wax becoming charred. If the wax does get too cold to work with, or the spout gets stopped up with chilled wax, hold the bowl of the tjanting in the hot wax in the melting pot and it will be found that the trouble is remedied instantly. If you have been unlucky enough to get grit or some other clogging substance in the spout, the insertion of a fine hair wire will usually clear it; this is almost a major operation though and should be performed most carefully as it is a delicate instrument you are handling and it costs money to repair it even if you are in the neighbourhood of some one who is able to re-solder it.
So fragile is the point of these fine instruments that even the sudden check caused by the rough fibre of some materials is sufficient to ruin the tip. When not in use the safest plan is to hang it in a box of its own or at least keep it in a place sacred to itself, with its spout upwards, so that there is no likelihood of accidental pressure to bend it out of shape. This careful handling of the tjanting is emphasized because, while the initial cost of a good instrument may seem high, it is a most satisfactory tool to use and with proper attention it should last a life-time. One that is in use today has been used steadily for the past twelve years and looks good for holding many more pints of melted wax.
The frontispiece shows a piece in which all the line work was done with a tjanting, the brush only being used to fill in the big surfaces, after the various dippings. The design is an adaptation from the Chinese, inspired by the decoration on a coramandel screen. The panel is worked out in seven colours: two golds, two greens, red, brown, and black. It was designed by the writer and executed by Emile Weeckers and himself.
The spout openings come in various sizes and with the finest almost hair-lines can be produced. The wax when ready to flow forms an infinitesimal globule which will run freely when just touched to the material and skimmed as lightly as possible over the surface. A heavy hand will drop the point so that it touches the fabric; the moment it does this the hole is automatically sealed and the wax cannot flow.
Many batikers are not able to obtain a tjanting and would not if they could, preferring to do their waxing entirely with brushes. Brushes, properly trimmed and of various sizes, will certainly give very satisfactory results to the careful worker. Of course the minute line possible with the tjanting, is impossible to achieve with a brush, though a line as narrow as the sixteenth of an inch can be made by a practised craftsman.
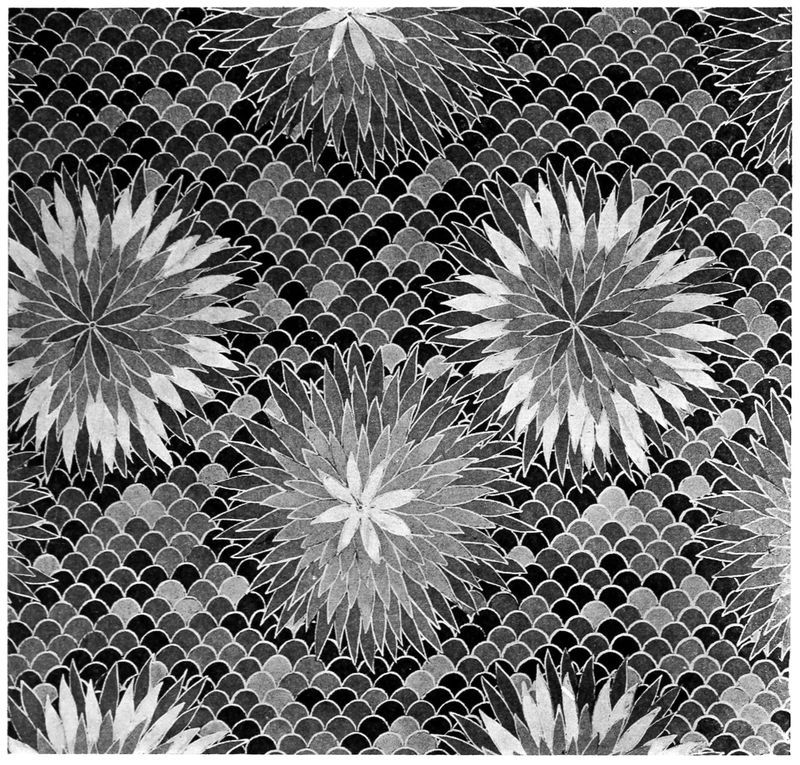
The all-over floral design shown facing page 36, designed by the writer and executed by Miss E. Shirtleff, was made in six colours. This panel was done in the “blue group,” explained in the chapter on dyeing. The outline of the flowers is in the original white of the material, the petals of the flowers range in colour from straw yellow to orange, with some of the outer ones in moss green. The background has a “wave design” worked out in all the different colours used in the flowers and an extra shade of dark green. The waxing of this piece was done entirely with the brush and has no line of a greater width than one-sixteenth of an inch.
This fine work is easier with shaped brush; this shaping is done without much difficulty by dipping the brush, preferably a good sable one, into hot wax, and, without pressing the globule formation out of shape, gently wiping the excess of wax from the distended bristles. Allow this to cool and when hard, trim to a point with a sharp knife. Melt the cold wax out by dipping in the wax pot and you will have a brush that will be more manageable and will hold more wax for the size of its point, than one would have with the regular unshaped brush. For covering big surfaces, one or two flat soft-haired varnish brushes will be needed.
For waxing, bees-wax with a mixture of white paraffin wax is used by most batikers, the proportion varying according to the brittleness desired. This of course is best worked out to suit the individual batiker’s requirements and after a little experimenting one soon learns to get a satisfactory mixture. One part paraffin to five parts of bees-wax will give the consistency of medium to produce the crackle surface so popular with many artists in America. Pure bees-wax cracks very little and will stand the highest temperature when in the dye-bath, and inversely the larger proportion of paraffin used the more the medium will crackle and the cooler the dye-bath must be used if one does not want one’s design to melt away. When no crackle at all is desired, the solution can be made more pliable by the addition of rosin. Use this, however, in hot dyes only, for it has unpleasant mannerisms, one of which is to increase the mixture’s brittleness when it is made to undergo a cold plunge.
Whilst on the subject of wax, a word may be well said regarding the care that should be taken to keep water out of the neighbourhood of the wax pot. One has only to allow a drop of water to get itself into the melted wax just once, to find out what a horribly messy spattering and explosion can result. One may gain in understanding and be able to sympathize with long-suffering relatives who declare that “Batik is such a messy business,” but it is hardly worth it. Of course it need not happen if a few precautions are taken, and it is perhaps better to take care at first than to run the risk of becoming unpopular in the household.
Another warning that may be of service to the worker in the country. Do not apply wax, in summer time, seated near an open window. A really true story tells how a batiker was sitting coolly working by a window and was visited by a solitary bee, who took a good look and one sniff at the wax pot and flew away. He returned immediately, however, with all his relations who swarmed gaily all over the work, the wax pot, and the worker to the great discomfort of the visited and the visitors. Exploding in boiling wax can hardly be a comfortable end to a busy life.
To complete the outfit one also needs a small agate pan in which to melt the wax, one about four inches deep will answer best and some sort of heating apparatus. A kerosene stove should not be used unless one is willing to blacken one’s utensils and most probably one’s self. Gas or an alcohol lamp with an adjustable burner are more satisfactory than an electric attachment as the ability to regulate the heat makes for great comfort when one wants to keep the wax at an even temperature. Of course if necessity demands it, any heat producer available can be used; an electric flat-iron turned upside-down can even be pressed into service although the inconvenience of having to keep one eye on the melting pot is great, when one wishes to give all one’s attention to the design; but if it is not watched the result may be a most uncomfortable “smoking-out.” Work in a warm room or near the stove and it will be found that the wax when in the tjanting will chill less quickly and will consequently be more manageable. These little hints may seem of small importance, but it is as well to take advantage of everything that will make the actual tool handling easier. There are likely to be troubles and mis-adventures enough with the rest of the process.
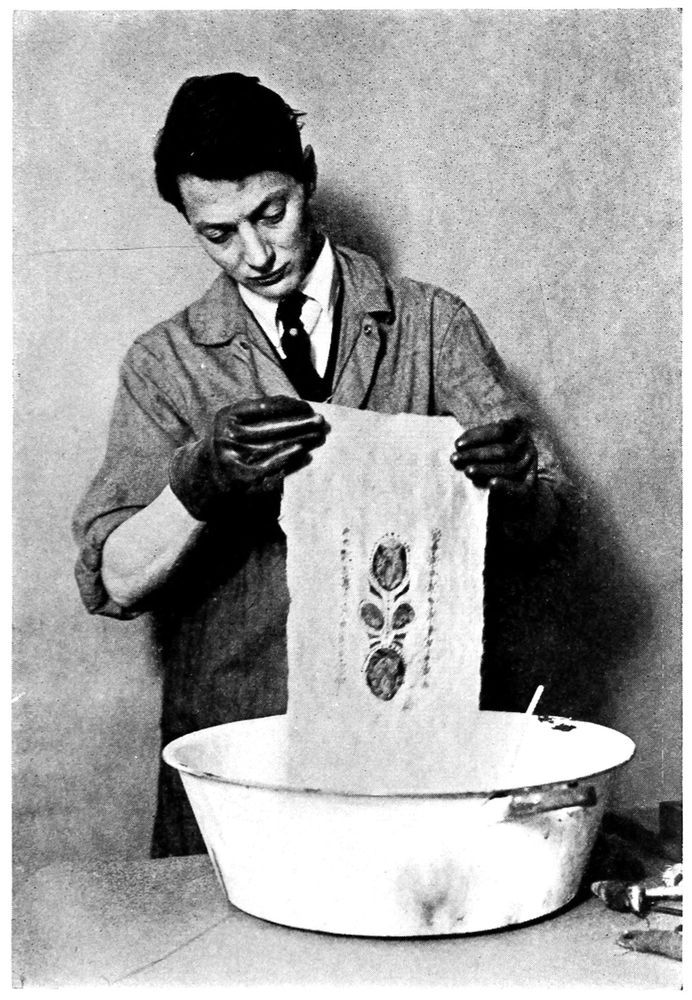
A great many people seem to be under the impression that the ordinary household dyes that are on the market are not good enough to use in batik work. There is a strong prejudice against Diamond dyes, but there is no reason for it, as these dyes when used according to directions, produce admirable results and are most practical for the beginner who is not in need of large quantities. For any one going extensively into dyeing, it is rather an expensive way of working and it is better to buy the dyes in bulk direct from the manufacturer. Rubber gloves will give some protection to the hands when handling materials in the dye-bath, but if, in spite of care, the hands or clothing become stained, soda or ammonia in the washing water will prove helpful. Lava soap is very good for removing stains from the skin.
One of the chief helps in successful dyeing is a good vessel for use as a dye-bath. If one is possibly obtainable, the best thing to use is a seamless copper tub. This utensil, however, is not within the reach of every student and it is quite possible to do satisfactory work in a good agate or enamel pan. Galvanized iron is safe to use with most dyes, but in time the acid used with some colours will eat into the metal. Be sure to get a big enough vessel as disaster follows goods that are crowded in the dye-bath.
A thermometer is quite a necessity, and one should also have a glass spoon and a stirring rod. For this latter, a couple of smooth round pieces of wood can successfully be substituted; these are used for lifting and manipulating the material in the dye-bath.
Batik can be done on all kinds of woven material, such as cotton, silk, velvet, wool, mixed goods or leather. It is rather difficult to get satisfactory results on cotton owing to the fact that cotton dyes have to be boiled in order to attain any degree of brilliancy, and of course boiling is not practical when one is dealing with waxed material. Japanese habutai silk is perhaps the easiest fabric to use and best for beginners’ experiments, as the wax penetrates easily and it takes colour well. This applies to chiffon and similar sheer materials, but of course their delicacy makes them harder to handle. Fibre silks, being composed of both animal and vegetable matter, should be dyed in “mixed goods dyes,” or should be first dipped in a bath of cotton dye, and then immersed in a dye for silk, of a similar shade. Very heavy silks and velvets are magnificent when batiked, but they should be sent to the professional finishers to be treated when the piece is completed as it takes a great deal of effort and considerable skill on the part of the amateur to finish a large heavy silk panel or to raise the flattened pile of velvet. Taffeta silk and very heavy satin are not good fabrics for the batik process, owing to the loading used in their manufacture.