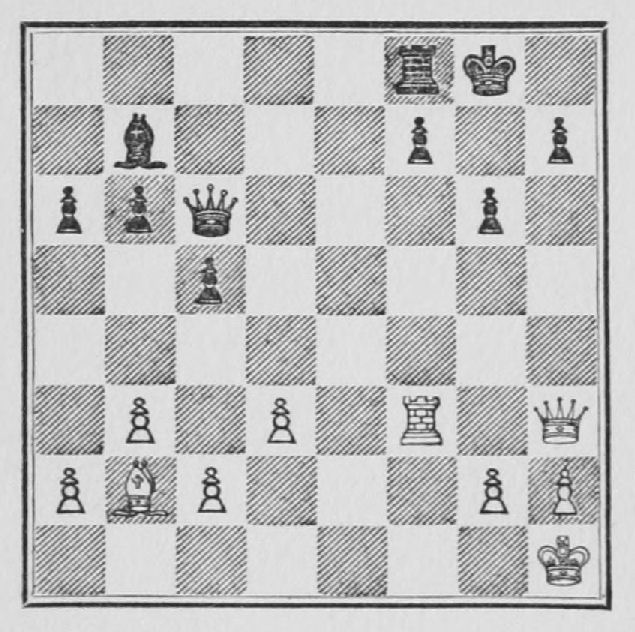
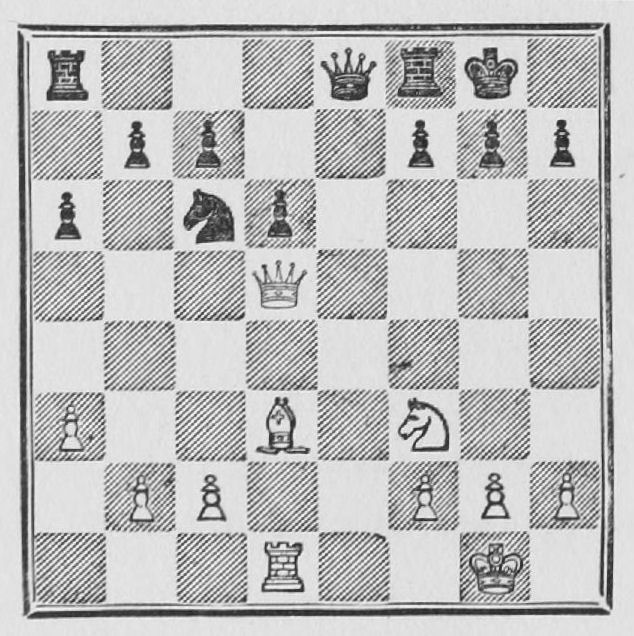
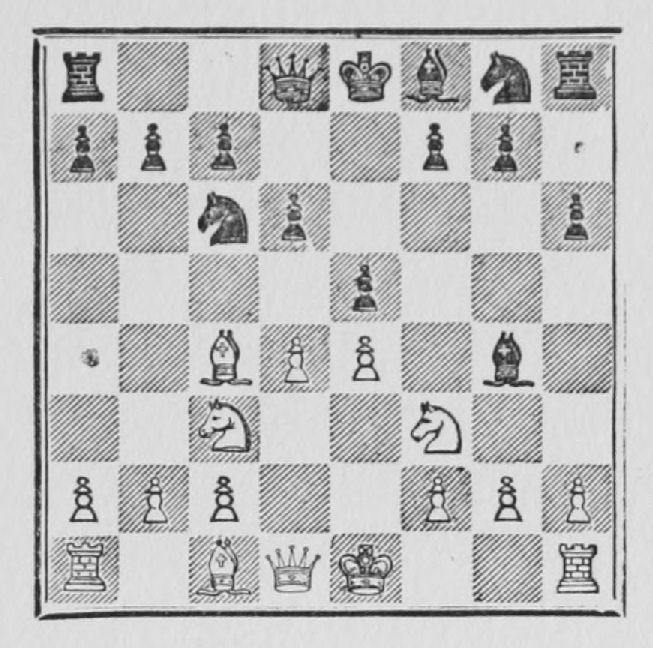
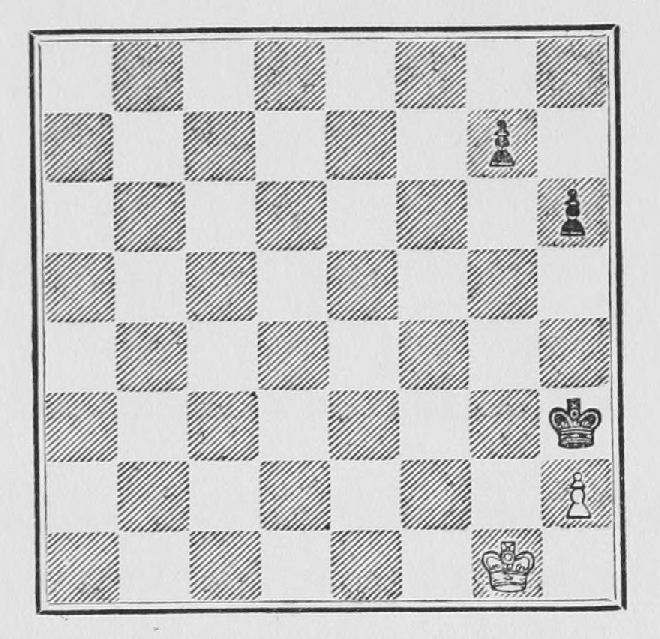
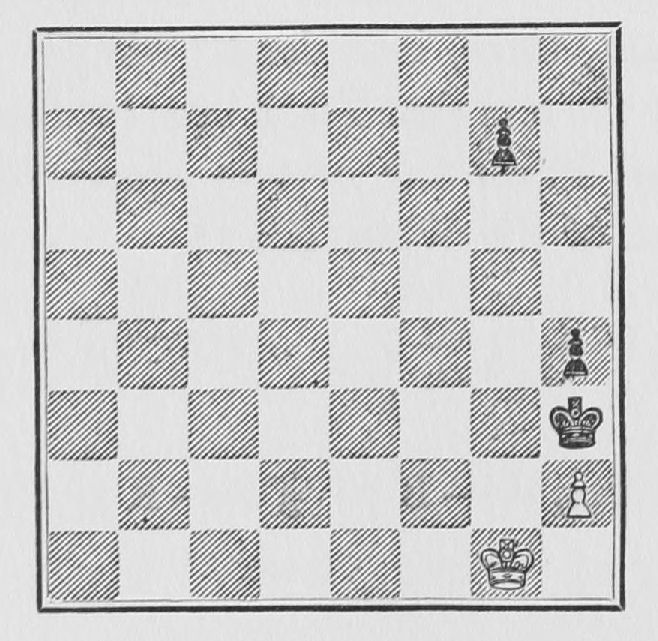
It is Black's move, and thinking that White merely threatens to play Q - R 6 and to mate at K Kt 7, Black plays 1 ... R - K 1, threatening mate by way of R - K 8. White now uncovers his real and most effective threat, viz.:
1 ... R - K 1; 2 Q × P ch, K × Q; 3 R - R 3 ch, K - Kt 1; 4 R - R 8 mate.
This same type of combination may come as the result of a somewhat more complicated position.
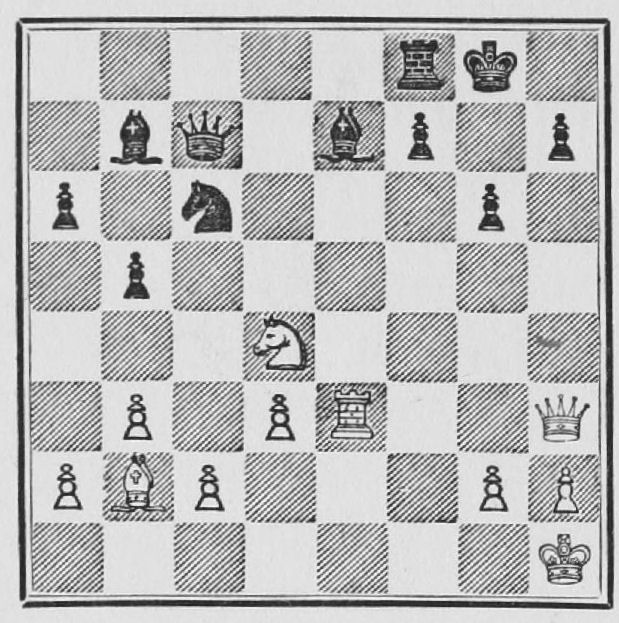
Example 12.
White is a piece behind, and unless he can win it back quickly he will lose; he therefore plays:
| 1. Kt × Kt | B - Kt 4 |
He cannot take the Kt because White threatens mate by Q × P ch followed by R - R 3 ch.
| 2. Kt - K 7 ch | Q × Kt |
Again if B × Kt; Q × P ch, K × Q; R - R 3 ch, King moves; R - R 8 mate.
| 3. R × Q | B × R | |
| 4. Q - Q 7 |
and White wins one of the two Bishops, remains with a Q and a B against a R and B, and should therefore win easily. These two examples show the danger of advancing the K Kt P one square, after having Castled on that side.
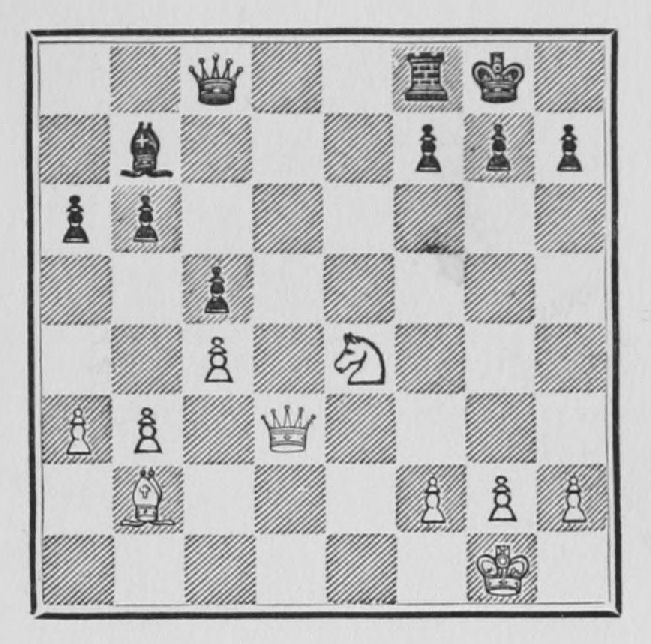
Example 13.
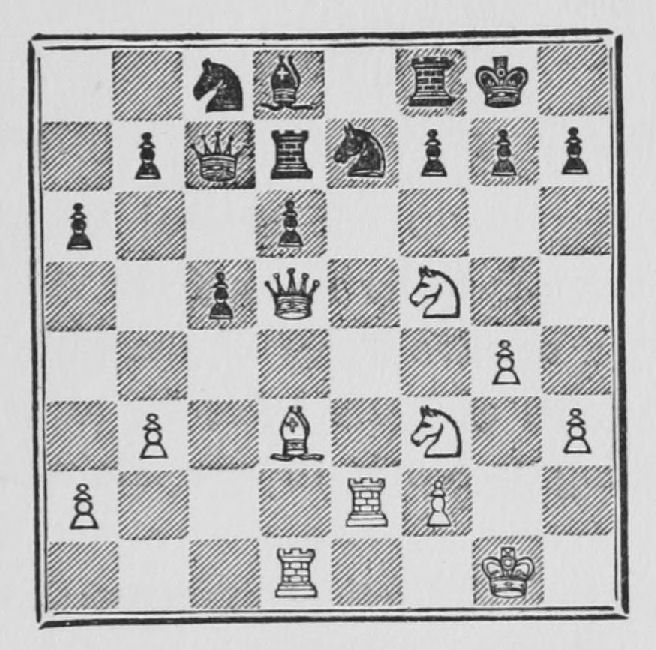
This is another very interesting type of combination. Black has a R for a Kt and should therefore win, unless White is able to obtain some compensation immediately. White, in fact, mates in a few moves thus:
| 1. Kt - B 6 ch | P × Kt |
Forced, otherwise Q X P mates.
| 2. Q - Kt 3 ch | K - R 1 | |
| 3. B × P mate. |
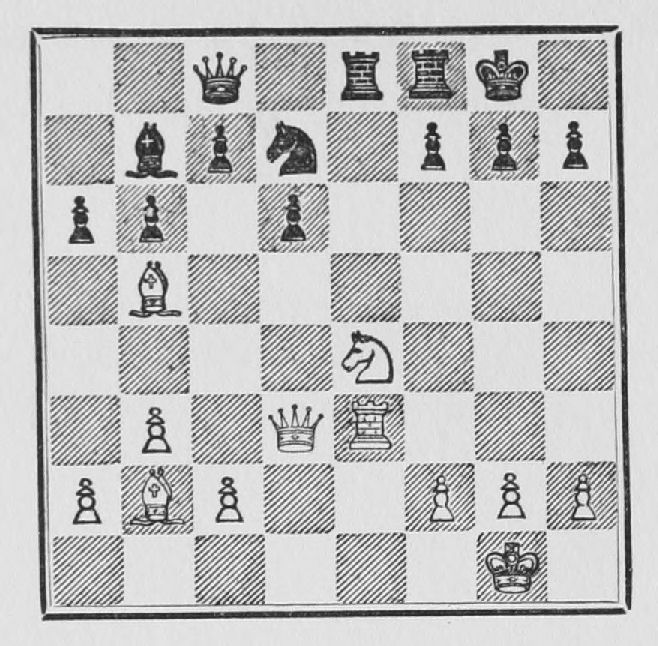
Example 14.—The same type of combination occurs in a more complicated form in the following position.
| 1. B × Kt | Q × B. |
If ...B × Kt; Q - B 3 threatens mate, and therefore wins the Q, which is already attacked.
| 2. Kt - B 6 ch | P × Kt | |
| 3. R - Kt 3 ch | K - R 1 | |
| 4. B × P mate. |
Example 15.—A very frequent type of combination is shown in the following position.
Here White is the exchange and a Pawn behind, but he can win quickly thus: 1 B × P ch, K × B. (If 1...K - R 1; 2 Q - K R 5, P - K Kt 3; 3 Q - R 6, and wins.)
2 Q - R 5 ch, K - Kt 1; 3 Kt - Kt 5, and Black cannot stop mate at K R 7 except by sacrificing the Queen by Q - K 5, which would leave White with a Q for a R.
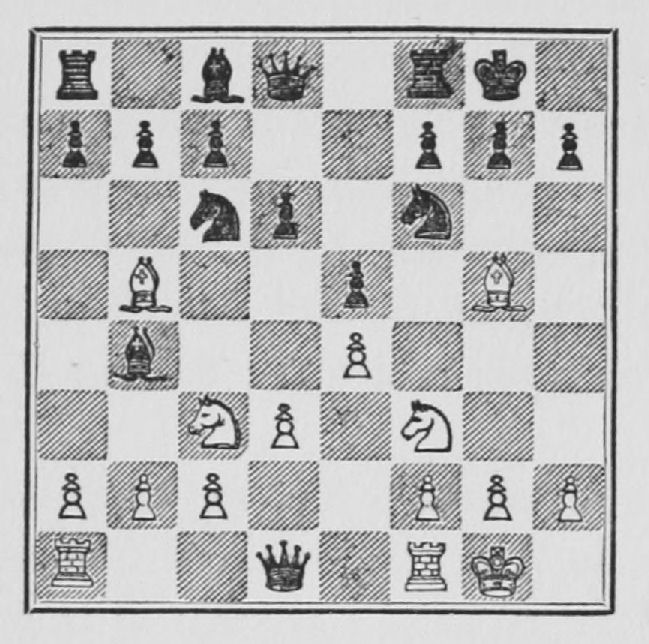
Example 16.—This same type of combination is seen in a more complicated form in the following position.
White proceeds as follows: 1 Kt × Kt ch (this clears the line for the B); B × Kt (to stop the Kt from moving to Kt 5 after the sacrifice of the B); 2 R × B, Kt × R best; 3 B × P ch, K × B. (If 3..K - R 1; 4 Q - R 5, P - K Kt 3; 5 B × P ch, K - Kt 2; 6 Q - R 7 ch, K - B 3; 7 P - Kt 5 ch, K - K 3; 8 B × P ch, R × B; 9 Q - K 4 mate.) 4 Q - R 5 ch, K - Kt 1; 5 Kt - Kt 5, R - B 1; 6 Q - R 7 ch, K - B 1; 7 Q - R 8 ch, Kt - Kt 1; 8 Kt - R 7 ch, K - K 2; 9 R - K 1 ch, K - Q 1; 10 Q × Kt mate.
This combination is rather long and has many variations, therefore a beginner will hardly be able to fathom it; but, knowing the type of combination, he might under similar circumstances undertake and carry out a brilliant attack which he would otherwise never think of. It will be seen that all the combinations shown have for a foundation the proper co-ordination of the pieces, which have all been brought to bear against a weak point.
5. RELATIVE VALUE OF THE PIECES
Before going on to the general principles of the openings, it is advisable to give the student an idea of the proper relative value of the pieces. There is no complete and accurate table for all of them, and the only thing to do is to compare the pieces separately.
For all general theoretical purposes the Bishop and the Knight have to be considered as of the same value, though it is my opinion that the Bishop will prove the more valuable piece in most cases; and it is well known that two Bishops are almost always better than two Knights.
The Bishop will be stronger against Pawns than the Knight, and in combination with Pawns will also be stronger against the Rook than the Knight will be.
A Bishop and a Rook are also stronger than a Knight and a Rook, but a Queen and a Knight may be stronger than a Queen and a Bishop.
A Bishop will often be worth more than three Pawns, but a Knight very seldom so, and may even not be worth so much.
A Rook will be worth a Knight and two Pawns, or a Bishop and two Pawns, but, as said before, the Bishop will be a better piece against the Rook.
Two Rooks are slightly stronger than a Queen. They are slightly weaker than two Knights and a Bishop, and a little more so than two Bishops and a Knight. The power of the Knight decreases as the pieces are changed off. The power of the Rook, on the contrary, increases.
The King, a purely defensive piece throughout the middle-game, becomes an offensive piece once all the pieces are off the board, and sometimes even when there are one or two minor pieces left. The handling of the King becomes of paramount importance once the end-game stage is reached.
6. GENERAL STRATEGY OF THE OPENING
The main thing is to develop the pieces quickly. Get them into play as fast as you can.
From the outset two moves, 1 P - K 4 or 1 P - Q 4, open up lines for the Queen and a Bishop. Therefore, theoretically one of these two moves must be the best, as no other first move accomplishes so much.
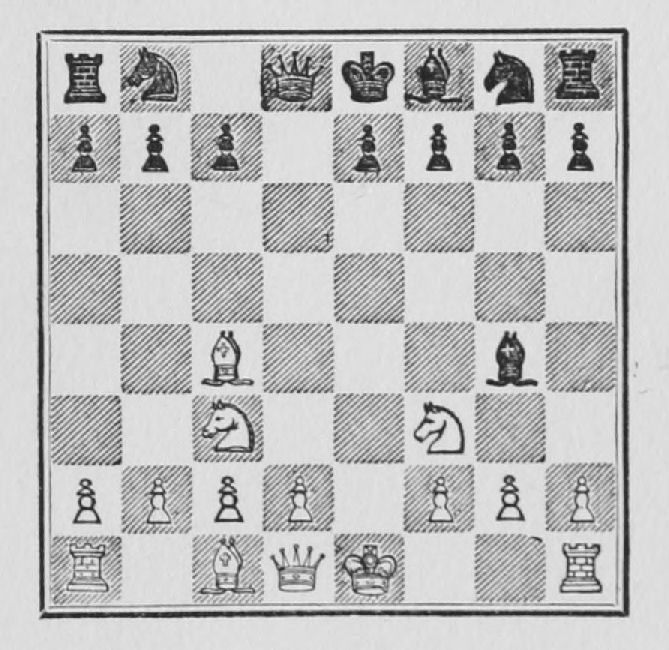
Example 17.—Suppose we begin:
| 1. P - K 4 | P - K 4 | |
| 2. Kt - K B 3 |
This is both an attacking and a developing move. Black can now either reply with the identical move or play
| 2. ........ | Kt - Q B 3 |
This developing move at the same time defends the King's Pawn.
| 3. Kt - B 3 | Kt - B 3 |
These moves are of a purely developing nature.
| 4. B - Kt 5 |
It is generally advisable not to bring this Bishop out until one Knight is out, preferably the King's Knight. The Bishop could also have been played to B 4, but it is advisable whenever possible to combine development and attack.
| 4. ........ | B - Kt 5 |
Black replies in the same manner, threatening a possible exchange of Bishop for Knight with Kt × P to follow.
| 5. O - O |
an indirect way of preventing 5...B × Kt, which more experience or study will show to be bad. At the same time the Rook is brought into action in the centre, a very important point.
| 5. ........ | O - O |
Black follows the same line of reasoning.
| 6. P - Q 3 | P - Q 3 |
These moves have a two-fold object, viz.: to protect the King's Pawn and to open the diagonal for the development of the Queen's Bishop.
| 7. B - Kt 5 |
A very powerful move, which brings us to the middle-game stage, as there is already in view a combination to win quickly by Kt - Q 5. This threat makes it impossible for Black to continue the same course. (There is a long analysis showing that Black should lose if he also plays B - Kt 5.) He is now forced to play 7...B × Kt, as experience has shown, thus bringing up to notice three things.
First, the complete development of the opening has taken only seven moves. (This varies up to ten or twelve moves in some very exceptional cases. As a rule, eight should be enough.) Second, Black has been compelled to exchange a Bishop for a Knight, but as a compensation he has isolated White's Q R P and doubled a Pawn. (This, at such an early stage of the game, is rather an advantage for White, as the Pawn is doubled towards the centre of the board.) Third, White by the exchange brings up a Pawn to control the square Q 4, puts Black on the defensive, as experience will show, and thus keeps the initiative, an unquestionable advantage.[1]
The strategical principles expounded above are the same for all the openings, only their tactical application varies according to the circumstances.
Before proceeding further I wish to lay stress on the following point which the student should bear in mind.
Before development has been completed no piece should be moved more than once, unless it is essential in order to obtain either material advantage or to secure freedom of action.
The beginner would do well to remember this, as well as what has already been stated: viz., bring out the Knights before bringing out the Bishops.
7. CONTROL OF THE CENTRE
The four squares, K 4 and Q 4 on each side respectively, are the centre squares, and control of these squares is called control of the centre. The control of the centre is of great importance. No violent attack can succeed without controlling at least two of these squares, and possibly three. Many a manœuvre in the opening has for its sole object the control of the centre, which invariably ensures the initiative. It is well always to bear this in mind, since it will often be the reason of a series of moves which could not otherwise be properly understood. As this book progresses I shall dwell more fully on these different points. At present I shall devote some time to openings taken at random and explain the moves according to general principles. The student will in that way train his mind in the proper direction, and will thus have less trouble in finding a way out when confronted with a new and difficult situation.
Example 18.
| 1. P - K 4 | P - K 4 | |
| 2. Kt - K B 3 | P - Q 3 |
A timid move. Black assumes a defensive attitude at once. On principle the move is wrong. In the openings, whenever possible, pieces should be moved in preference to Pawns.
| 3. P - Q 4 |
White takes the offensive immediately and strives to control the centre so as to have ample room to deploy his forces.
| 3. ........ | Kt - Q 2 |
Black does not wish to relinquish the centre and also prefers the text move to Kt - Q B 3, which would be the more natural square for the Kt. But on principle the move is wrong, because it blocks the action of the Queen's Bishop, and instead of facilitating the action of Black's pieces, tends, on the contrary, to cramp them.
| 4. B - Q B 4 | P - K R 3 |
Black is forced to pay the penalty of his previous move. Such a move on Black's part condemns by itself any form of opening that makes it necessary. White threatened Kt - Kt 5 and Black could not stop it with 4...B - K 2, because of 5 P × P, Kt × P (if 5...P × P, 6 Q - Q 5); 6 Kt × Kt, P × Kt; 7 Q - R 5, and White wins a Pawn and has besides a perfectly safe position.
| 5. Kt - B 3 | K Kt - B 3 | |
| 6. B - K 3 | B - K 2 | |
| 7. Q - K 2 |
It should be noticed that White does not Castle yet. The reason is that he wants to deploy his forces first, and through the last move force Black to play P - Q B 3 to make room for the Queen as White threatens R - Q 1, to be followed by P × P. Black's other alternatives would finally force him to play P × P, thus abandoning the centre to White.
| 7. ........ | P - B 3 | |
| 8. R - Q 1 | Q - B 2 | |
| 9. O - O |
With this last move White completes his development, while Black is evidently somewhat hampered. A simple examination will suffice to show that White's position is unassailable. There are no weak spots in his armour, and his pieces are ready for any manœuvre that he may wish to carry out in order to begin the attack on the enemy's position. The student should carefully study this example. It will show him that it is sometimes convenient to delay Castling. I have given the moves as they come to my mind without following any standard book on openings. Whether the moves given by me agree or not with the standard works, I do not know, but at the present stage of this book it is not convenient to enter into discussions of mere technicalities which the student will be able to understand when he has become more proficient.
Example 19.
| 1. P - K 4 | P - K 4 | |
| 2. Kt - K B 3 | P - Q 3 | |
| 3. P - Q 4 | B - Kt 5 |
A bad move, which violates one of the principles set down, according to which at least one Knight should be developed before the Bishops are brought out, and also because it exchanges a Bishop for a Knight, which in the opening is generally bad, unless there is some compensation.
| 4. P × P | B × Kt |
4...P × P loses a Pawn.
| 5. Q × B | P × P | |
| 6. B - Q B 4 | Q - B 3 |
If Kt - B 3; Q - Q Kt 3 wins a Pawn.
| 7. Q - Q Kt 3 | P - Q Kt 3 | |
| 8. Kt - B 3 | P - Q B 3 |
To prevent Kt - Q 5.
Black, however, has no pieces out except his Queen, and White, with a Bishop and a Knight already developed, has a chance of obtaining an advantage quickly by playing Kt - Q 5 anyway. The student is left to work out the many variations arising from this position.
These examples will show the practical application of the principles previously enunciated. The student is warned against playing Pawns in preference to pieces at the beginning of the game, especially P - K R 3 and P - Q R 3, which are moves very commonly indulged in by beginners.
8. TRAPS
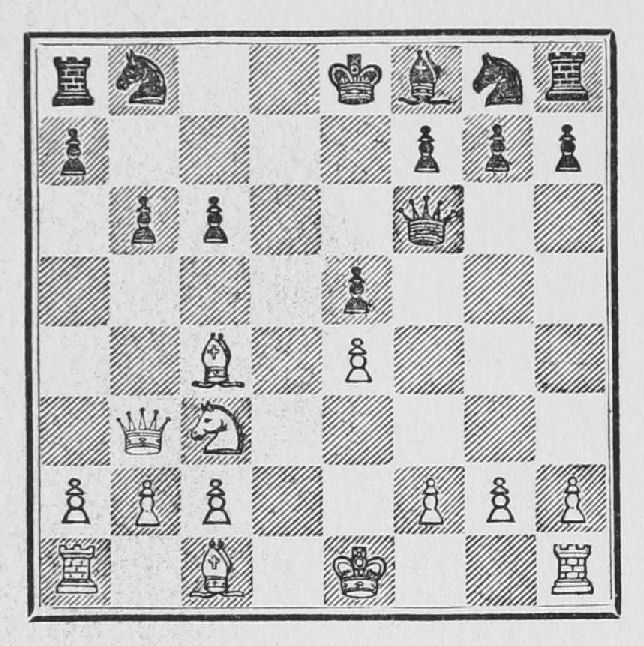
I shall now give a few positions or traps to be avoided in the openings, and in which (practice has shown) beginners are often caught.
Example 20.
White plays:
| 1. P × P | Kt × P |
Black should have recaptured with the Pawn.
| 2. Kt × Kt | B × Q | |
| 3. B × P ch | K - K 2 | |
| 4. Kt - Q 5 mate. |
Example 21.
Black, having the move, should play P - K 3. But suppose he plays Kt - K B 3 instead, then comes—
| 1. B × P ch |
Kt - K 5 would also give White the advantage, the threat being of course if B × Q; 2 B × P mate. Nor does B - R 5 help matters, because of 2 Q × B, 1... B - K 3 leaves Black with the inferior position. But White's move in the text secures an immediate material advantage, and the beginner at any rate should never miss such an opportunity for the sake of a speculative advantage in position.
| 1. ........ | K × B | |
| 2. Kt - K 5 ch | K moves | |
| 3. Kt × B |
and White has won a Pawn besides having the better position.
There are a good many other traps—in fact, there is a book written on traps on the chess board; but the type given above is the most common of all.
CHAPTER II
Further Principles in End-Game Play
We shall now go back to the endings in search of a few more principles, then again to the middle-game, and finally to the openings once more, so that the advance may not only be gradual but homogeneous. In this way the foundation on which we expect to build the structure will be firm and solid.
9. A CARDINAL PRINCIPLE
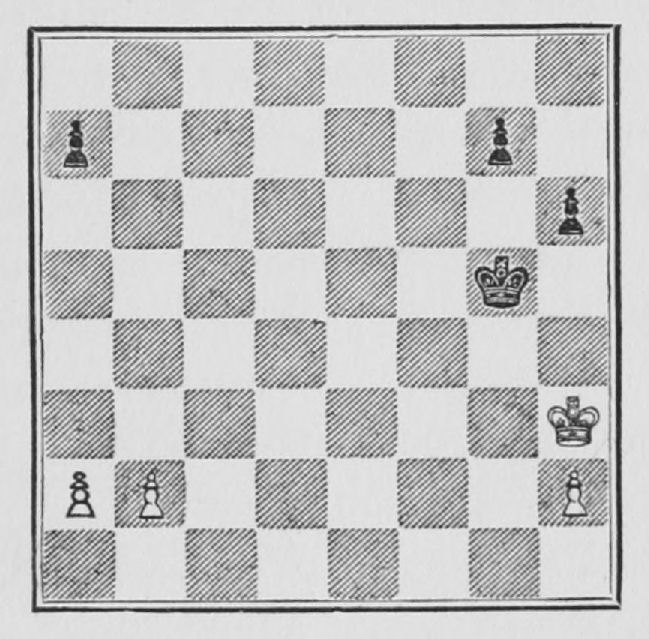
In the position shown above, White can draw by playing P - Kt 4 according to the general rule that governs such cases, i.e. to advance the Pawn that is free from opposition. But suppose that White, either because he does not know this principle or because he does not, in this case, sufficiently appreciate the value of its application; suppose, we say, that he plays 1 P - Q R 4. Then Black can win by playing 1... P - Q R 4, applying one of the cardinal principles of the high strategy of chess—
A unit that holds two.
In this case one Pawn would hold two of the opponent's Pawns. The student cannot lay too much stress on this principle. It can be applied in many ways, and it constitutes one of the principal weapons in the hands of a master.
Example 22.—The example given should be sufficient proof. We give a few moves of the main variation:—
| 1. P - R 4 | P - Q R 4 | |
| 2. K - Kt 2 | K - B 5 | |
| (Best; see why.) | ||
| 3. P - Kt 4 | P × P | |
| (Best.) | ||
| 4. P - R 5 | P - Kt 6 | |
| 5. P - R 6 | P - Kt 7 | |
| 6. P - R 7 | P - Kt 8 (Q) | |
| 7. P - R 8 (Q) | Q - K 5 ch | |
| 8. Q × Q | K × Q |
This brings the game to a position which is won by Black, and which constitutes one of the classical endings of King and Pawns. I shall try to explain the guiding idea of it to those not familiar with it.
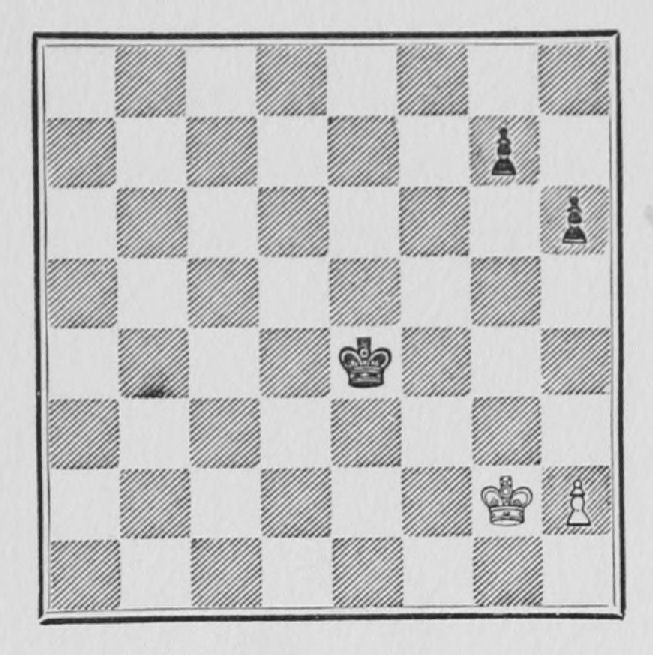
10. A CLASSICAL ENDING
Example 23.—In this position White's best line of defence consists in keeping his Pawn where it stands at R 2. As soon as the Pawn is advanced it becomes easier for Black to win. On the other hand, Black's plan to win (supposing that White does not advance his Pawn) may be divided into three parts. The first part will be to get his King to K R 6, at the same time keeping intact the position of his Pawns. (This is all important, since, in order to win the game, it is essential at the end that Black may be able to advance his rearmost Pawn one or two squares according to the position of the White King.)
| 1. K - Kt 3 | K - K 6 | |
| 2. K - Kt 2 |
If 2 K - Kt 4, K - B 7; 3 P - R 4, P - Kt 3 will win.
| 2. ........ | K - B 5 | |
| 3. K - B 2 | K - Kt 5 | |
| 4. K - Kt 2 | K - R 5 | |
| 5. K - Kt 1 | K - R 6 |
The first part has been completed.
The second part will be short and will consist in advancing the R P up the K.
| 6. K - R 1 | P - R 4 | |
| 7. K - Kt 1 | P - R 5 |
This ends the second part.
The third part will consist in timing the advance of the Kt P so as to play P - Kt 6 when the White King is at R 1. It now becomes evident how necessary it is to be able to move the Kt P either one or two squares according to the position of the White King, as indicated previously.[2] In this case, as it is White's move, the Pawn will be advanced two squares since the White King will be in the corner, but if it were now Black's move the Kt P should only be advanced one square since the White King is at Kt 1.
| 8. K - R 1 | P - Kt 4 | |
| 9. K - Kt 1 | P - Kt 5 | |
| 10. K - R 1 | P - Kt 6 | |
| 11. P × P |
If K - Kt 1, P - Kt 7.
| 11. ........ | P × P | |
| 12. K - Kt 1 | P - Kt 7 | |
| 13. K - B 2 | K - R 7 |
and wins.
It is in this analytical way that the student should try to learn. He will thus train his mind to follow a logical sequence in reasoning out any position. This example is excellent training, since it is easy to divide it into three stages and to explain the main point of each part.
The next subject we shall study is the simple opposition, but before we devote our time to it I wish to call attention to two things.
11. OBTAINING A PASSED PAWN
When three or more Pawns are opposed to each other in some such position as the one in Example 24, there is always a chance for one side or the other of obtaining a passed Pawn.
