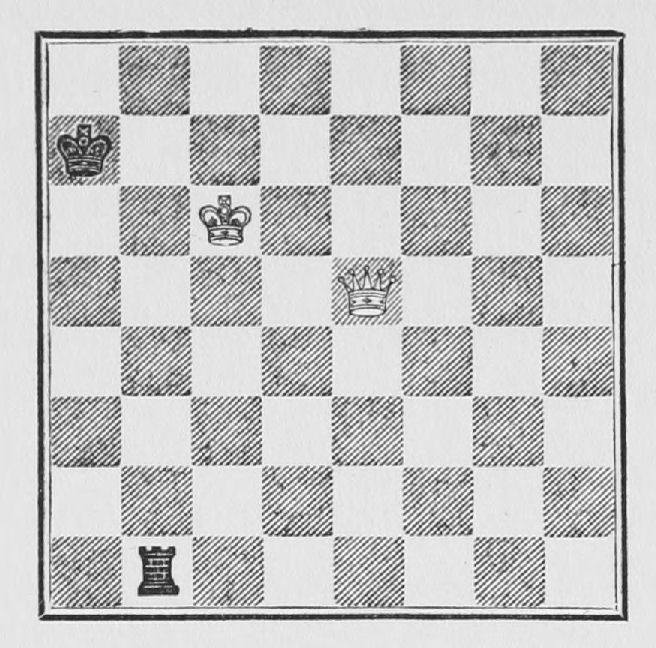
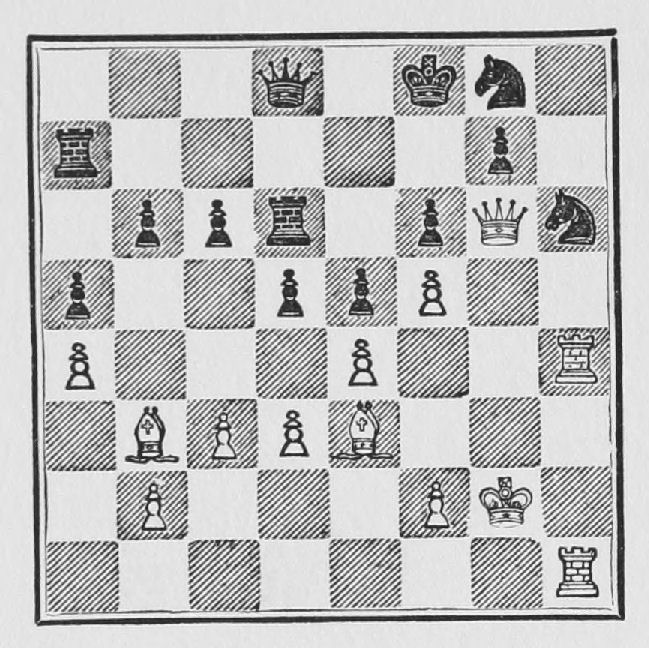
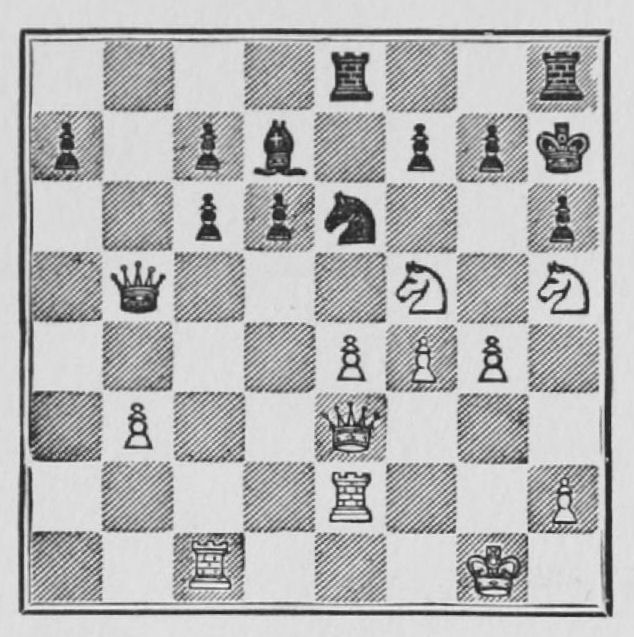
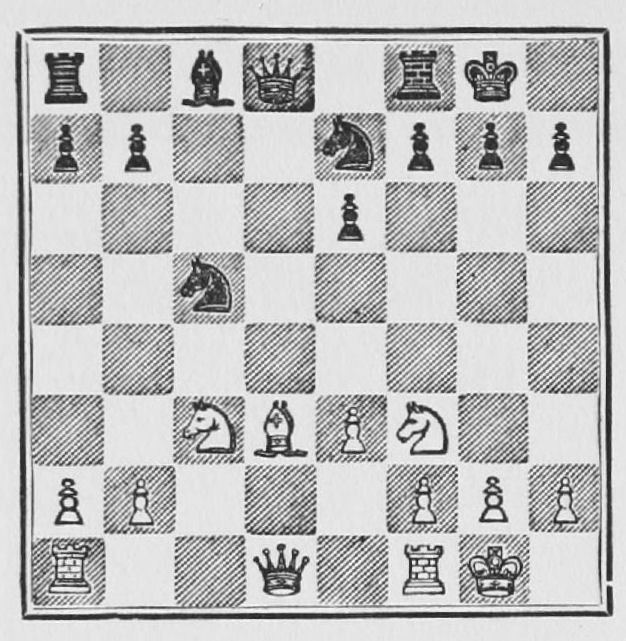
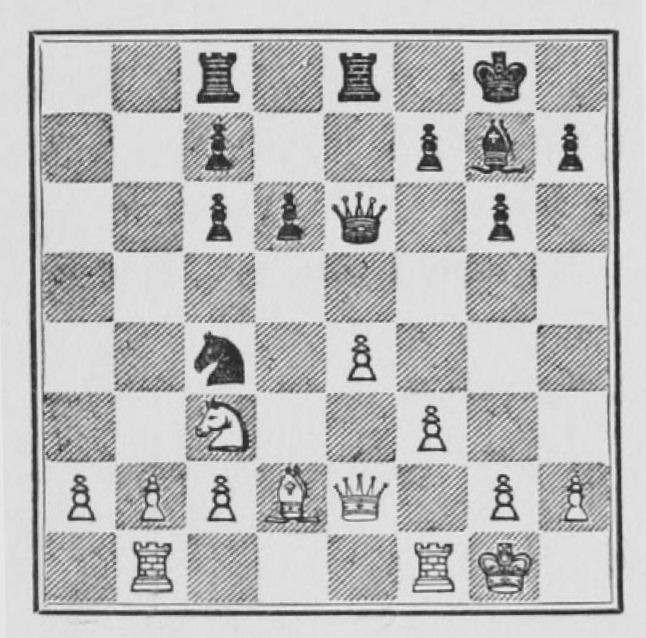
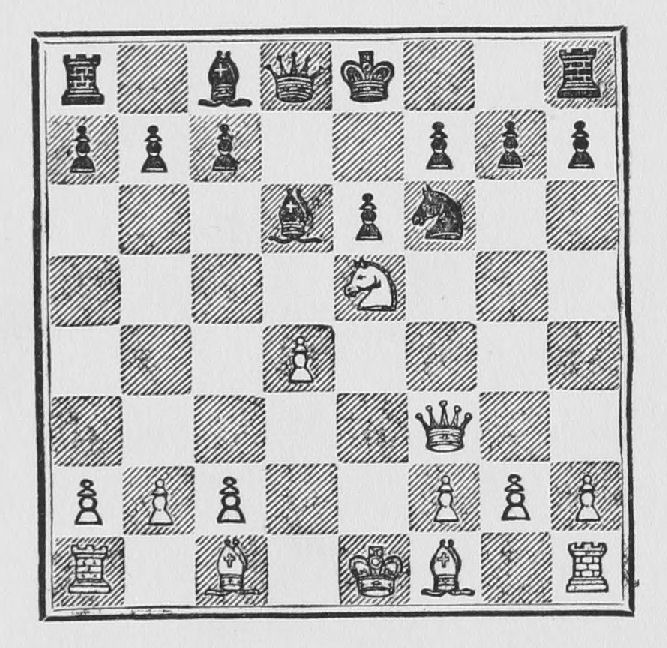
Example 41.—The procedure here is very similar. The things to bear in mind are that the Rook must be prevented from interposing at Kt 1 because of an immediate mate, and in the same way the King must be prevented from going either to R 3 or B 1.
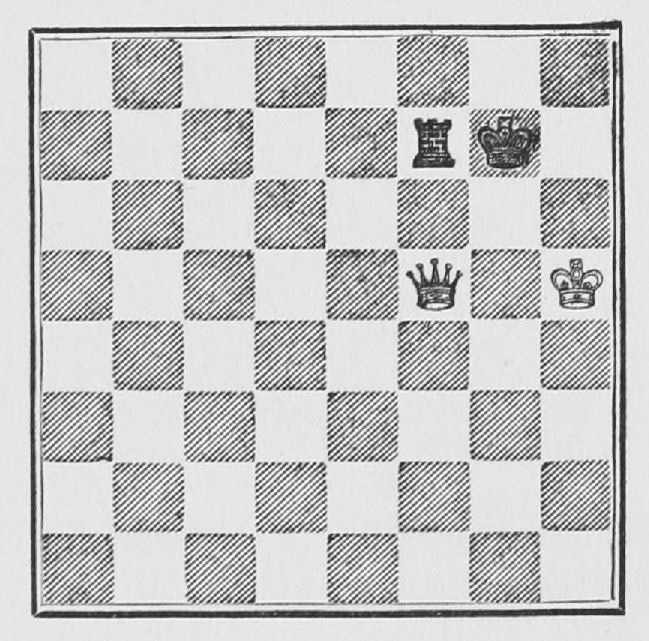
Example 42.—We shall now examine a more difficult position.
Many players would be deceived by this position. The most likely looking move is not the best. Thus suppose we begin
| 1. Q - K 5 ch | K - B 1 | |
| 2. K - Kt 6 | R - Q 2 |
The only defence, but, unfortunately, a very effective one, which makes it very difficult for White, since he cannot play 3 Q - K 6 because of 3...R - Kt 2 ch; 4 K - B 6, R - Kt 3 ch draws. Nor can he win quickly by 3 Q - Q B 5 ch because 3...K - K 1, 4 K - B 6, R - Q 3 ch ! driving back the White King.
Now that we have seen the difficulties of the situation let us go back. The best move is
| 1. Q - Kt 5 ch ! | K - R 1 |
If K - R 2; 2 Q - Kt 6 ch, K - R 1; 3 K - R 6 !
| 2. Q - K 5 ch ! | K - R 2 best | |
| 3. K - Kt 5 | R - R 2 ! best |
If 3...R - Kt 2 ch; 4 K - B 6 leads to a position similar to those in Examples 40 and 41.
| 4. Q - K 4 ch | K - Kt 1 | |
| 5. Q - B 4 ch | K - R 2 | |
| 6. K - B 6 | R - K Kt 2 | |
| 7. Q - R 4 ch | K - Kt 1 | |
| 8. Q - R 5 |
and we have the position of Example 40 with Black to move.
Let us go back again.
| 1. Q - Kt 5 ch | K - B 1 | |
| 2. Q - Q 8 ch | K - Kt 2 | |
| 3. K - Kt 5 | R - B 6 |
The best place for the Rook away from the King. 3...K - R 2; 4 Q - Q 4, R - Kt 2 ch; 5 K - B 6 would lead to positions similar to those already seen.
| 4. Q - Q 4 ch | K - B 1 | |
| 5. K - Kt 6 |
5 Q - Q 6 ch, K - Kt 2; 6 Q - K 5 ch, K - B 1; 7 K - Kt 6 would also win the Rook. The text move, however, is given to show the finesse of such endings. White now threatens mate at Q 8.
| 5. ........ | R - Kt 6 ch | |
| 6. K - B 6 | R - B 6 ch | |
| 7. K - K 6 | R - K R 6 |
White threatened mate at K R 8.
| 8. Q - B 4 ch |
and the Rook is lost.
Note, in these examples, that the checks at long range along the diagonals have often been the key to all the winning manœuvres. Also that the Queen and King are often kept on different lines. The student should carefully go over these positions and consider all the possibilities not given in the text.
He should once more go through everything already written before proceeding further with the book.
CHAPTER III
Planning a Win in Middle-Game Play
I shall now give a few winning positions taken from my own games. I have selected those that I believe can be considered as types, i.e. positions that may easily occur again in a somewhat similar form. A knowledge of such positions is of great help; in fact, one cannot know too many. It often may help the player to find, with little effort, the right move, which he might not be able to find at all without such knowledge.
17. ATTACKING WITHOUT THE AID OF KNIGHTS
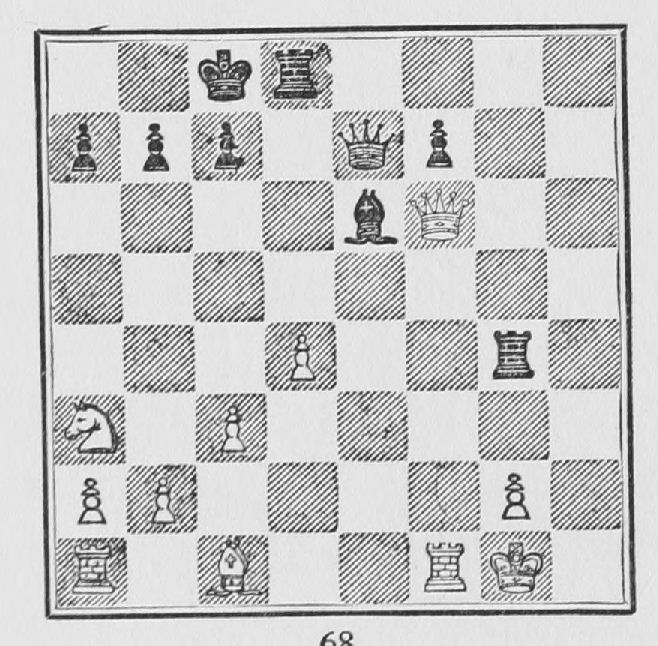
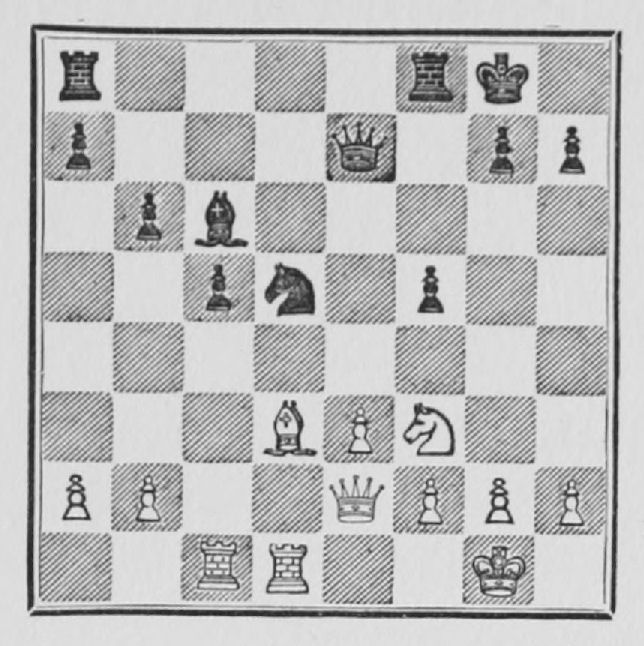
Example 43.—It is Black's move, and as he is a Kt and P behind he must win quickly, if at all. He plays:
| 1. ........ | Q R - Kt 1 ! | |
| 2. R - B 2 |
If, Q × Q, R × P ch; K - R 1, B - Q 4 and mate follows in a few moves.
| 2. ........ | R × P ch | |
| 3. K - B 1 | B - B 5 ch | |
| 4. Kt × B | R - Kt 8 mate |
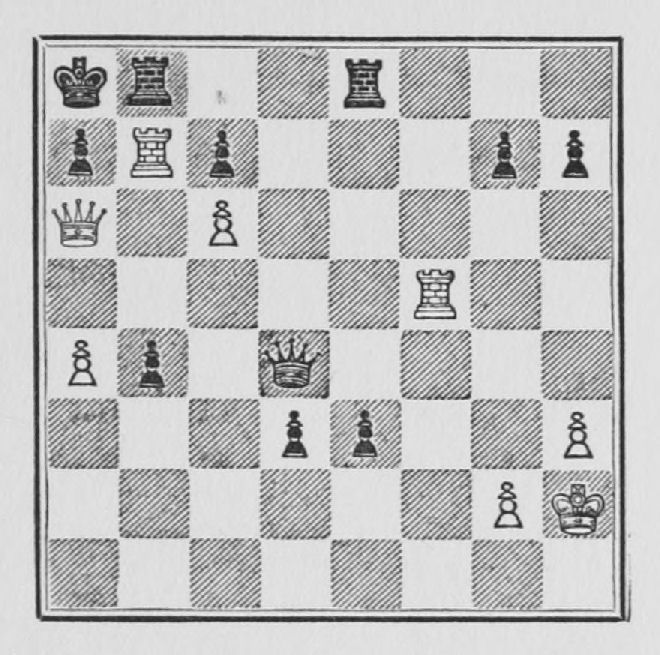
Example 44.—Black's last move was P - K 6, played with the object of stopping what he thought was White's threat, viz.: R - Q R 5, to which he would have answered Q - B 5 ch and drawn the game by perpetual check. White, however, has a more forceful move, and he mates in three moves as follows:
| 1. R × P ch | Q × R | |
| 2. R - Q R 5 | Black moves | |
| 3. White mates |
Example 45.—White has a beautiful position, but still he had better gain some material, if he can, before Black consolidates his defensive position. He therefore plays:
| 1. R × Kt ! | P × R | |
| 2. B × P ch | K - K 2 |
If Kt × B; R × Kt and Black would be helpless.
| 3. Q - R 7 ch | K - K 1 | |
| 4. Q × Kt ch | K - Q 2 | |
| 5. Q - R 7 ch | Q - K 2 | |
| 6. B - B 8 | Q × Q | |
| 7. R × Q ch | K - K 1 | |
| 8. R × R | Resigns |
In these few examples the attacking has been done by Rooks and Bishops in combination with the Queen. There have been no Knights to take part in the attack. We shall now give some examples in which the Knights play a prominent part as an attacking force.
18. ATTACKING WITH KNIGHTS AS A PROMINENT FORCE
Example 46.—White is two Pawns behind. He must therefore press on his attack. The game continues:
| 1. Kt (B 5) × Kt P | Kt - B 4 |
Evidently an error which made the winning easier for White, as he simply took the Rook with the Knight and kept up the attack. Black should have played: 1 ... Kt × Kt. Then would have followed: 2 Kt - B 6 ch, K - Kt 3; 3 Kt × B, P - B 3 (best); 4 P - K 5, K - B 2; 5 Kt × P, R - K 2; 6 Kt - K 4, and Black should lose.[4]
Example 47.—The student should carefully examine the position, as the sacrifice of the Bishop in similar situations is typical, and the chance for it is of frequent occurrence in actual play. The game continues:
| 1. B × P ch | K × B | |
| 2. Kt - Kt 5 ch | K - Kt 3 |
Best. If 2...K - R 3; 3 Kt × P ch wins the Queen, and if 2...K - Kt 1; 3 Q - R 5, with an irresistible attack.
| 3. Q - Kt 4 | P - B 4 | |
| 4. Q - Kt 3 | K - R 3 |
White finally won.[5]
19. WINNING BY INDIRECT ATTACK
We have so far given positions where the attacks were of a violent nature and directed against the King's position. Very often, however, in the middle-game attacks are made against a position or against pieces, or even Pawns.
The winning of a Pawn among good players of even strength often means the winning of the game.
Hence the study of such positions is of great importance. We give below two positions in which the attack aims at the gain of a mere Pawn as a means of ultimately winning the game.
Example 48.—Black is a Pawn behind, and there is no violent direct attack against White's King. Black's pieces, however, are very well placed and free to act, and by co-ordinating the action of all his pieces he is soon able not only to regain the Pawn but to obtain the better game. The student should carefully consider this position and the subsequent moves. It is a very good example of proper co-ordination in the management of forces. The game continues:
| 1. ........ | R - R 1 | |
| 2. P - Q R 4 |
White's best move was P - Q Kt 3, when would follow Kt × B; 3 Q × Kt, R - R 6 and Black would ultimately win the Q R P, always keeping a slight advantage in position. The text move makes matters easier.
| 2. ........ | Kt × B | |
| 3. Q × Kt | Q - B 5 | |
| 4. K R - Q 1 | K R - Kt 1 |
Black could have regained the Pawn by playing B × Kt, but he sees that there is more to be had, and therefore increases the pressure against White's Queen side. He now threatens, among other things, R × Kt P.
| 5. Q - K 3 | R - Kt 5 |
Threatening to win the exchange by B - Q 5.
| 6. Q - Kt 5 | B - Q 5 ch | |
| 7. K - R 1 | Q R - Kt 1 |
This threatens to win the Kt, and thus forces White to give up the exchange.
| 8. R × B | Q × R | |
| 9. R - Q 1 | Q - B 5 |
Now Black will recover his Pawn.
Example 49.—An examination of this position will show that Black's main weakness lies in the exposed position of his King, and in the fact that his Q R has not yet come into the game. Indeed, if it were Black's move, we might conclude that he would have the better game, on account of having three Pawns to two on the Queen's side, and his Bishop commanding the long diagonal.
It is, however, White's move, and he has two courses to choose from. The obvious move, B - B 4, might be good enough, since after 1 B - B 4, Q R - Q 1; 2 P - Q Kt 4 would make it difficult for Black. But there is another move which completely upsets Black's position and wins a Pawn, besides obtaining the better position. That move is Kt - Q 4 ! The game continues as follows:
| 1. Kt - Q 4 ! | P × Kt | |
| 2. R × B | Kt - Kt 5 |
There is nothing better, as White threatened B - B 4.
| 3. B - B 4 ch | K - R 1 | |
| 4. R - K 6 | P - Q 6 | |
| 5. R × P |
And White, with the better position, is a Pawn ahead.
These positions have been given with the idea of acquainting the student with different types of combinations. I hope they will also help to develop his imagination, a very necessary quality in a good player. The student should note, in all these middle-game positions, that—
once the opportunity is offered, all the pieces are thrown into action "en masse" when necessary; and that all the pieces smoothly co-ordinate their action with machine-like precision.
That, at least, is what the ideal middle-game play should be, if it is not so altogether in these examples.
CHAPTER IV
General Theory
Before we revert to the technique of the openings it will be advisable to dwell a little on general theory, so that the openings in their relation to the rest of the game may be better understood.
20. THE INITIATIVE
As the pieces are set on the board both sides have the same position and the same amount of material. White, however, has the move, and the move in this case means the initiative, and the initiative, other things being equal, is an advantage. Now this advantage must be kept as long as possible, and should only be given up if some other advantage, material or positional, is obtained in its place. White, according to the principles already laid down, develops his pieces as fast as possible, but in so doing he also tries to hinder his opponent's development, by applying pressure wherever possible. He tries first of all to control the centre, and failing this to obtain some positional advantage that will make it possible for him to keep on harassing the enemy. He only relinquishes the initiative when he gets for it some material advantage under such favourable conditions as to make him feel assured that he will, in turn, be able to withstand his adversary's thrust; and finally, through his superiority of material, once more resume the initiative, which alone can give him the victory. This last assertion is self-evident, since, in order to win the game, the opposing King must be driven to a position where he is attacked without having any way of escape. Once the pieces have been properly developed the resulting positions may vary in character. It may be that a direct attack against the King is in order; or that it is a case of improving a position already advantageous; or, finally, that some material can be gained at the cost of relinquishing the initiative for a more or less prolonged period.
21. DIRECT ATTACKS EN MASSE
In the first case the attack must be carried on with sufficient force to guarantee its success. Under no consideration must a direct attack against the King be carried on à outrance unless there is absolute certainty in one's own mind that it will succeed, since failure in such cases means disaster.
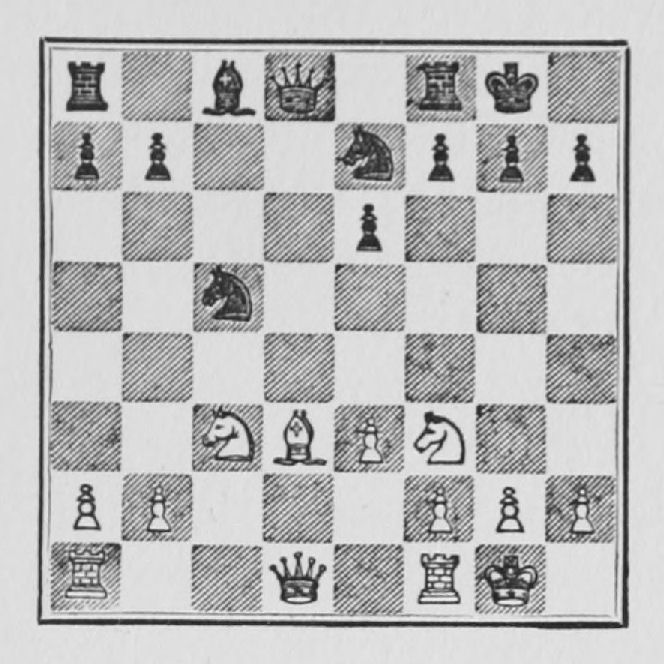
Example 50.—A good example of a successful direct attack against the King is shown in the following diagram:
In this position White could simply play B - B 2 and still have the better position, but instead he prefers an immediate attack on the King's side, with the certainty in his mind that the attack will lead to a win. The game continues thus:[6]
| 12. B × P ch | K × B | |
| 13. Kt - Kt 5 ch | K - Kt 3 | |
| 14. Q - Kt 4 | P - B 4 |
Best. P - K 4 would have been immediately fatal. Thus: 14...P - K 4; 15 Kt - K 6 ch, K - B 3; 16 P - B 4 ! P - K 5; 17 Q - Kt 5 ch, K × Kt; 18 Q - K 5 ch, K - Q 2; 19 K R - Q 1 ch, Kt - Q 6; 20 Kt × P, K - B 3 (if K - K 1, Kt - Q 6 ch wins the Queen); 21 R × Kt, Q × R; 22 R - B 1 ch, K - Kt 3 (if K - Q 2 mate in two); 23 Q - B 7 ch and mate in five moves.
| 15. Q - Kt 3 | K - R 3 | |
| 16. Q - R 4 ch | K - Kt 3 | |
| 17. Q - R 7 ch | K - B 3 |
If K × Kt; Q × Kt P ch and mate in a few moves.
| 18. P - K 4 | Kt - Kt 3 | |
| 19. P × P | P × P | |
| 20. Q R - Q 1 | Kt - Q 6 | |
| 21. Q - R 3 | Kt (Q 6) - B 5 | |
| 22. Q - Kt 3 | Q - B 2 | |
| 23. K R - K 1 | Kt - K 7 ch |
This blunder loses at once, but the game could not be saved in any case; e.g. 23...B - K 3; 24 R × B ch, Kt × R; 25 Kt - Q 5 mate.
| 24. R × Kt | Q × Q | |
| 25. Kt - R 7 ch | K - B 2 | |
| 26. R P × Q | R - R 1 | |
| 27. Kt - Kt 5 ch | K - B 3 | |
| 28. P - B 4 | Resigns |
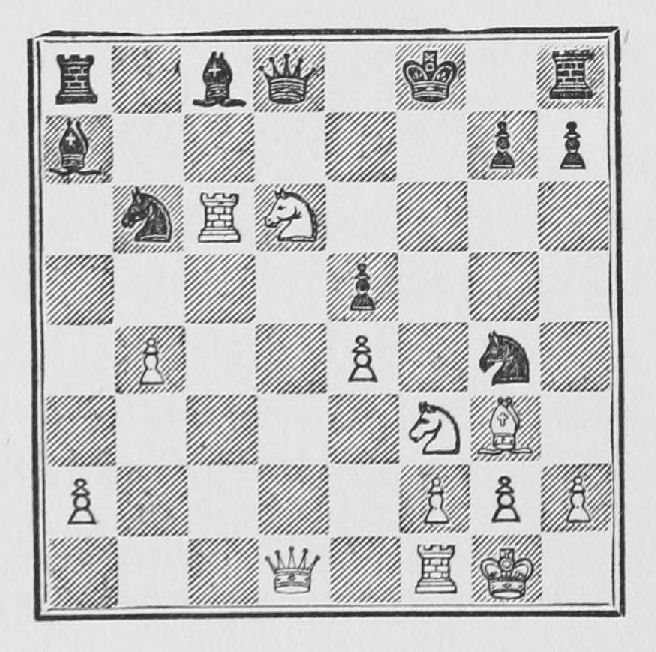
Example 51.—Another example of this kind:
In the above position the simple move Kt × P would win, but White looks for complications and their beauties. Such a course is highly risky until a wide experience of actual master-play has developed a sufficient insight into all the possibilities of a position. This game, which won the brilliancy prize at St. Petersburg in 1914, continued as follows:—
| 21. B - R 4 | Q - Q 2 | |
| 22. Kt × B | Q × R | |
| 23. Q - Q 8 ch | Q - K 1 |
If K - B 2; 24 Kt - Q 6 ch, King moves; 25 mate.
| 24. B - K 7 ch | K - B 2 | |
| 25. Kt - Q 6 ch | K - Kt 3 | |
| 26. Kt - R 4 ch | K - R 4 |
If 26...K - R 3; 27 Kt (Q 6) - B 5 ch, K - R 4; 28 Kt × P ch, K - R 3; 29 Kt (R 4) - B 5 ch, K - Kt 3; 30 Q - Q 6 ch and mate next move.
| 27. Kt × Q | R × Q | |
| 28. Kt × P ch | K - R 3 | |
| 29. Kt (Kt 7) - B 5 ch | K - R 4 | |
| 30. P - K R 3 ! |
The climax of the combination started with 21 B - R 4. White is still threatening mate, and the best way to avoid it is for Black to give back all the material he has gained and to remain three Pawns behind.
The student should note that in the examples given the attack is carried out with every available piece, and that often, as in some of the variations pointed out, it is the coming into action of the last available piece that finally overthrows the enemy. It demonstrates the principle already stated:
Direct and violent attacks against the King must be carried en masse, with full force, to ensure their success. The opposition must be overcome at all cost; the attack cannot be broken off, since in all such cases that means defeat.
22. THE FORCE OF THE THREATENED ATTACK
Failing an opportunity, in the second case, for direct attack, one must attempt to increase whatever weakness there may be in the opponent's position; or, if there is none, one or more must be created. It is always an advantage to threaten something, but such threats must be carried into effect only if something is to be gained immediately. For, holding the threat in hand, forces the opponent to provide against its execution and to keep material in readiness to meet it. Thus he may more easily overlook, or be unable to parry, a thrust at another point. But once the threat is carried into effect, it exists no longer, and your opponent can devote his attention to his own schemes. One of the best and most successful manœuvres in this type of game is to make a demonstration on one side, so as to draw the forces of your opponent to that side, then through the greater mobility of your pieces to shift your forces quickly to the other side and break through, before your opponent has had the time to bring over the necessary forces for the defence.
A good example of positional play is shown in the following game:
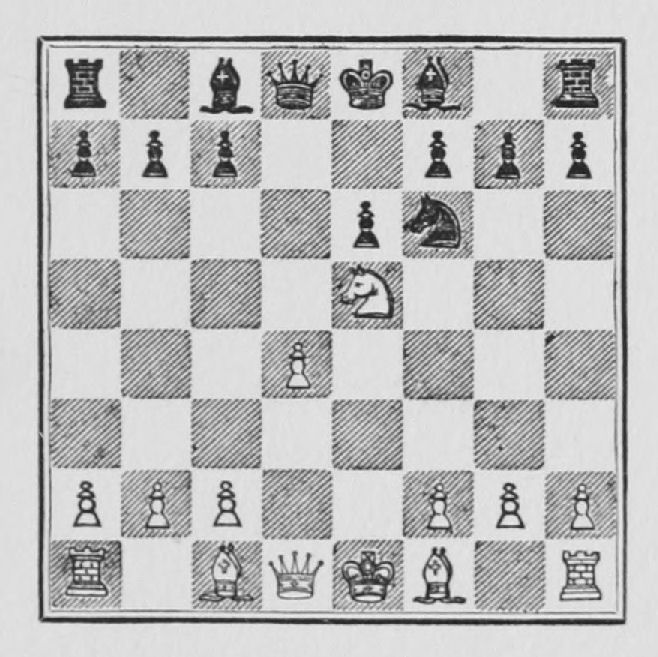
Example 52.—Played at the Havana International Masters Tournament, 1913. (French Defence.) White: J. R. Capablanca. Black: R. Blanco.
| 1. P - K 4 | P - K 3 | |
| 2. P - Q 4 | P - Q 4 | |
| 3. Kt - Q B 3 | P × P | |
| 4. Kt × P | Kt - Q 2 | |
| 5. Kt - K B 3 | K Kt - B 3 | |
| 6. Kt × Kt ch | Kt × Kt | |
| 7. Kt - K 5 |
This move was first shown to me by the talented Venezuelan amateur, M. Ayala. The object is to prevent the development of Black's Queen's Bishop viâ Q Kt 2, after P - Q Kt 3, which is Black's usual development in this variation. Generally it is bad to move the same piece twice in an opening before the other pieces are out, and the violation of that principle is the only objection that can be made to this move, which otherwise has everything to recommend it.
| 7. ........ | B - Q 3 | |
| 8. Q - B 3 |
B - K Kt 5 might be better. The text move gives Black an opportunity of which he does not avail himself
| 8. ........ | P - B 3 |
P - B 4 was the right move. It would have led to complications, in which Black might have held his own; at least, White's play would be very difficult. The text move accomplishes nothing, and puts Black in an altogether defensive position. The veiled threat B × Kt; followed by Q - R 4 ch; is easily met.
| 9. P - B 3 | O - O | |
| 10. B - K Kt 5 | B - K 2 |
The fact that Black has now to move his Bishop back clearly demonstrates that Black's plan of development is faulty. He has lost too much time, and White brings his pieces into their most attacking position without hindrance of any sort.
| 11. B - Q 3 | Kt - K 1 |
The alternative was Kt - Q 4. Otherwise White would play Q - R 3, and Black would be forced to play P - K Kt 3 (not P - K R 3, because of the sacrifice B × P), seriously weakening his King's side.
| 12. Q - R 3 | P - K B 4 |
White has no longer an attack, but he has compelled Black to create a marked weakness. Now White's whole plan will be to exploit this weakness (the weak K P), and the student can now see how the principles expounded previously are applied in this game. Every move is directed to make the weak King's Pawn untenable, or to profit by the inactivity of the Black pieces defending the Pawn, in order to improve the position of White at other points.
| 13. B × B | Q × B | |
| 14. O - O | R - B 3 | |
| 15. K R - K 1 | Kt - Q 3 | |
| 16. R - K 2 | B - Q 2 |
At last the Bishop comes out, not as an active attacking piece, but merely to make way for the Rook.
| 17. Q R - K 1 | R - K 1 | |
| 18. P - Q B 4 | Kt - B 2 |
A very clever move, tending to prevent P - B 5, and tempting White to play Kt × B, followed by B × P, which would be bad, as the following variation shows: 19 Kt × B, Q × Kt; 20 B × P, Kt - Kt 4; 21 Q - Kt 4, R × B; 22 P - K R 4, P - K R 4; 23 Q × R, P × Q; 24 R × R ch, K - R 2; 25 P × Kt, Q × P. But it always happens in such cases that, if one line of attack is anticipated, there is another; and this is no exception to the rule, as will be seen.
