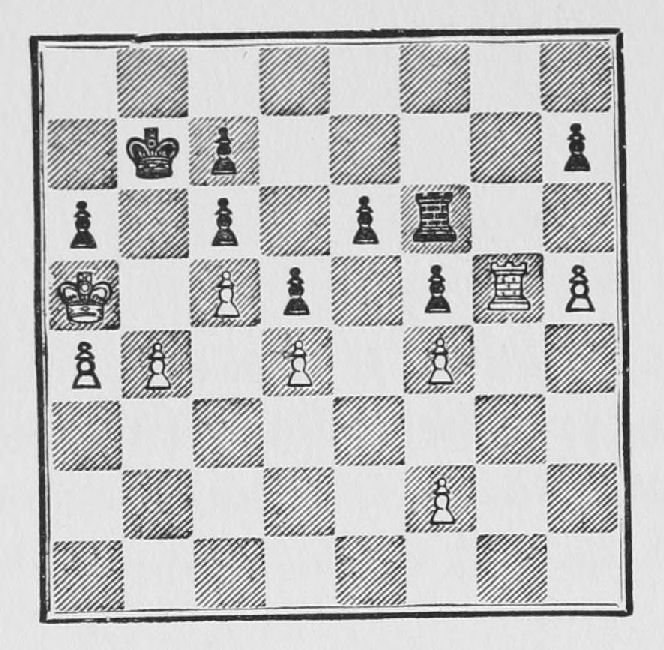
| 15. P - Q 5 |
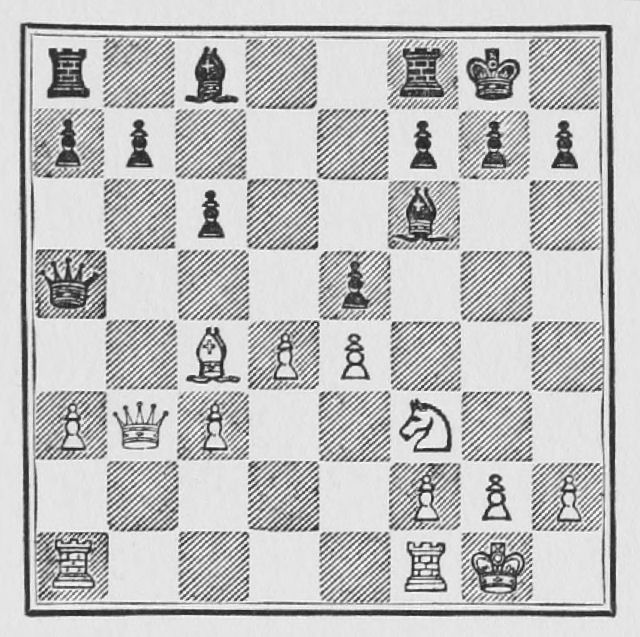
(White might play 15 K R - Q 1, keeping the option of breaking up the centre later on. I wanted him to advance this P as there is now a fine post for my B at Q B 4.) By this move White shows that he does not understand the true value of his position. His only advantage consisted in the undeveloped condition of Black's Q B. He should therefore have made a plan to prevent the B from coming out, or if that were not possible, then he should try to force Black to weaken his Pawn position in order to come out with the B. There were three moves to consider: first, P - Q R 4, in order to maintain the White B in the dominating position that it now occupies. This would have been met by Q - B 2; second, either of the Rooks to Q 1 in order to threaten 16 P × P, B × P; 17 Kt × B, Q × Kt; 18 B × P ch. This would have been met by B - Kt 5; and third, P - K R 3 to prevent B - Kt 5 and by playing either R to Q 1, followed up as previously stated to force Black to play P - Q Kt 4, which would weaken his Queen's side Pawns. Thus by playing P - K R 3 White would have attained the desired object. The text move blocks the action of the White B and facilitates Black's development. Hereafter White will act on the defensive, and the interest throughout the rest of the game will centre mainly on Black's play and the manner in which he carries out the attack.
| 15. ........ | Q - B 2 | |
| 16. B - Q 3 |
(This seems wrong, as it makes the development of Black's Queen wing easier. At present he cannot play P - Q Kt 3, because of the reply P × P followed by B - Q 5.)
| 16. ........ | P - Q Kt 3 | |
| 17. P - B 4 | B - Kt 2 | |
| 18. K R - B 1 |
(With the idea of Q R - Kt 1 and P - B 5. But it only compels Black to bring his B to Q B 4, which he would do in any case.)
| 18. ........ | B - K 2 | |
| 19. R - B 2 | B - B 4 | |
| 20. Q - Kt 2 | P - B 3 |
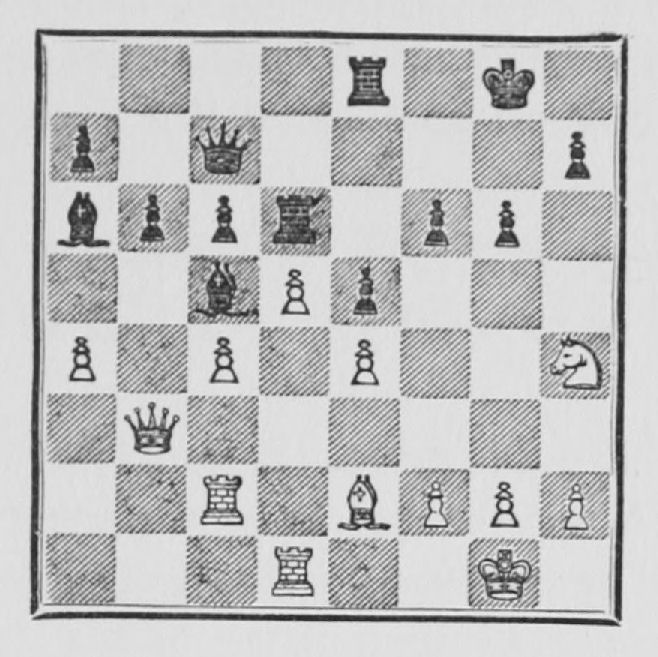
(It would have been better, probably, to play 20...K R - K 1, with the idea of P - B 4 presently.) Black's play hereabout is weak; it lacks force, and there seems to be no well-defined plan of attack. It is true that these are the most difficult positions to handle in a game. In such cases a player must conceive a plan on a large scale, which promises chances of success, and with it all, it must be a plan that can be carried out with the means at his disposal. From the look of the position it seems that Black's best chance would be to mass his forces for an attack against White's centre, to be followed by a direct attack against the King. He should, therefore, play Q R - K 1, threatening P - K B 4. If White is able to defeat this plan, or rather to prevent it, then, once he has fixed some of the White pieces on the King's side, he should quickly shift his attack to the Queen's side, and open a line for his Rooks, which, once they enter in action, should produce an advantage on account of the great power of the two Bishops.
| 21. Q R - Kt 1 | Q R - Q 1 | |
| 22. P - Q R 4 | B - R 3 | |
| 23. R - Q 1 |
(White has clearly lost time with his Rook's moves.)
| 23. ........ | K R - K 1 | |
| 24. Q - Kt 3 |
(To bring his Queen across after Kt - R 4 and B - K 2.)
| 24. ........ | R - Q 3 | |
| 25. Kt - R 4 | P - Kt 3 | |
| 26. B - K 2 |
| 26. ........ | P × P |
(I thought this exchange necessary here, as White is threatening to play his Bishop via Kt 4 to K 6. If he retook with the Bishop's Pawn I intended to exchange Bishops and rely on the two Pawns to one on the Queen's wing. I did not expect him to retake it with the King's Pawn, which seemed to expose him to a violent King's side attack.) Black's judgment in this instance I believe to be faulty. Had White retaken with the B P, as he expected, he would have had the worst of the Pawn position, as White would have had a passed Pawn well supported on the Queen's side. His only advantage would lie in his having a very well posted Bishop against a badly posted Knight, and on the fact that in such positions as the above, the Bishop is invariably stronger than the Knight. He could and should have prevented all that, by playing B - B 1, as, had White then replied with Q - Kt 3, he could then play P × P, and White would not have been able to retake with the B P on account of B × P ch winning the exchange.
| 27. K P × P | P - K 5 | |
| 28. P - Kt 3 | P - K 6 |
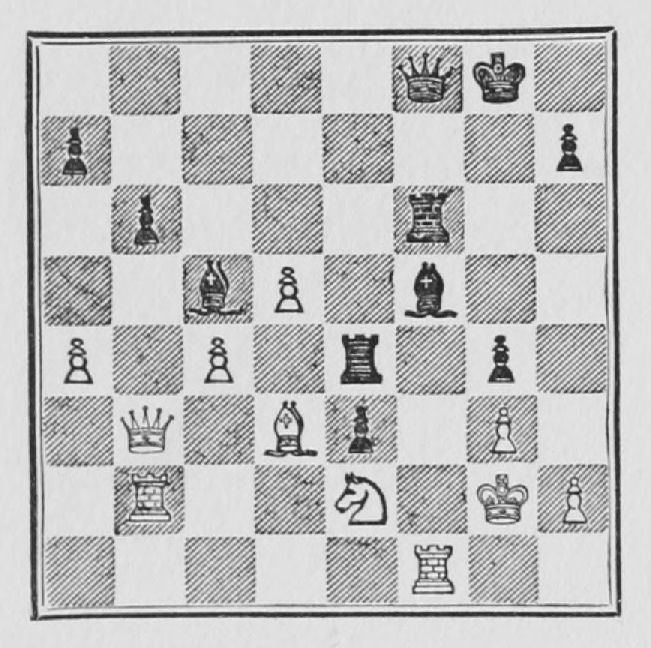
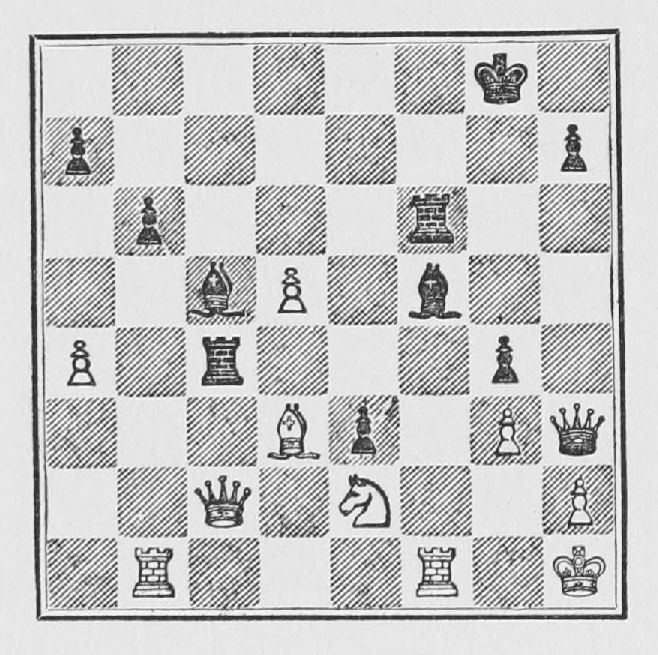
I do not like this move. It would have been better to hold it in reserve and to have played P - B 4, to be followed in due time by P - K Kt 4 and P - B 5, after having placed the Q at Q 2, K B 2, or some other square as the occasion demanded. The text move blocks the action of the powerful B at Q B 4, and tends to make White's position safer than it should have been. The move in itself is a very strong attacking move, but it is isolated, and there is no effective continuation. Such advances as a rule should only be made when they can be followed by a concerted action of the pieces.
| 29. P - B 4 | B - B 1 | |
| 30. Kt - B 3 | B - B 4 | |
| 31. R - Kt 2 | R - K 5 | |
| 32. K - Kt 2 | Q - B 1 | |
| 33. Kt - Kt 1 | P - K Kt 4 |
(If now 34 B - B 3, P × P; 35 B × R, B × B ch, with a winning attack.)
| 34. P × P | P × P | |
| 35. R - K B 1 | P - Kt 5 |
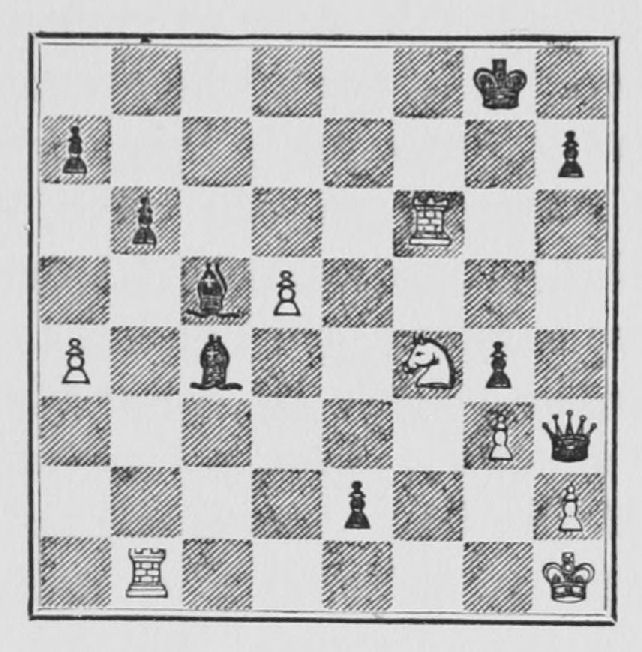
R - R 3 was the alternative. White's only move would have been K - R 1. The position now is evidently won for Black, and it is only a question of finding the right course. The final attack is now carried on by Sir George Thomas in an irreproachable manner.
| 36. B - Q 3 | R - K B 3 | |
| 37. Kt - K 2 | Q - B 1 |
(Again preventing B × R, by the masked attack on White's Rook. White therefore protects his Rook.) If Kt - B 4, P - K 7 !; 39 Kt × P, R × Kt ch; 40 R × R, B - K 5 ch !!; 41 B × B, best, R × R and White is lost. If, however, against 38 Kt - B 4, Black plays Q - R 3, and White 39 Q - B 2, I take pleasure in offering the position to my readers as a most beautiful and extraordinary win for Black, beginning with 39...Q - R 6 ch !!! I leave the variations for the student to work out.
| 38. R (Kt 2) - Kt 1 | Q - R 3 | |
| 39. Q - B 2 |
(Making a double attack on the Rook—which still cannot be taken—and preparing to defend the K R P.) If either the Rook or Bishop are taken White would be mated in a few moves.
| 39. ........ | Q - R 6 ch | |
| 40. K - R 1 | R × P !! |
(If 40...R - R 3; 41 Kt - Kt 1, Q × Kt P; 42 Q - K Kt 2. Black therefore tries to get the Queen away from the defence.) A very beautiful move, and the best way to carry on the attack.
| 41. Q × R |
(The best defence was 41 R × B, but Black would emerge with Queen against Rook and Knight.)
| 41. ........ | B × B |
(Again, not R - K R 3; because of P - Q 6 dis. ch.)
| 42. R × R |
(If 42 Q × B, then, at last, R - R 3 wins.)
| 42. ........ | B × Q | |
| 43. Kt - B 4 | P - K 7 ! |
(The Queen has no escape, but White has no time to take it.)
| 44. R - K Kt 1 | Q - B 8 |
White resigns. A very fine finish.
CHAPTER V
End-Game Strategy
We must now revert once more to the endings. Their importance will have become evident to the student who has taken the trouble to study my game with Janowski (Example 53). After an uneventful opening—a Ruy Lopez—in one of its normal variations, my opponent suddenly made things interesting by offering the exchange; an offer which, of course, I accepted. Then followed a very hard, arduous struggle, in which I had to defend myself against a very dangerous attack made possible by the excellent manœuvring of my adversary. Finally, there came the time when I could give back the material and change off most of the pieces, and come to an ending in which I clearly had the advantage. But yet the ending itself was not as simple as it at first appeared, and finally—perhaps through one weak move on my part—it became a very difficult matter to find a win. Had I been a weak end-game player the game would probably have ended in a draw, and all my previous efforts would have been in vain. Unfortunately, that is very often the case among the large majority of players; they are weak in the endings; a failing from which masters of the first rank are at times not free. Incidentally, I might call attention to the fact that all the world's champions of the last sixty years have been exceedingly strong in the endings: Morphy, Steinitz, and Dr. Lasker had no superiors in this department of the game while they held their titles.
26. THE SUDDEN ATTACK FROM A DIFFERENT SIDE
I have previously stated, when speaking about general theory, that at times the way to win consists in attacking first on one side, then, granted greater mobility of the pieces, to transfer the attack quickly from one side to the other, breaking through before your opponent has been able to bring up sufficient forces to withstand the attack. This principle of the middle-game can sometimes be applied in the endings in somewhat similar manner.
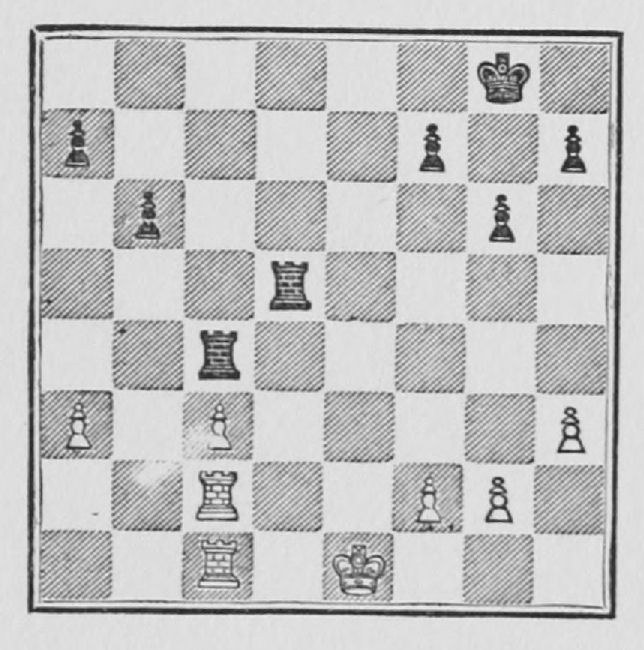
Example 56.
In the above position I, with the Black pieces, played:
| 1. ........ | R - K 5 ch | |
| 2. R - K 2 | R - Q R 5 | |
| 3. R - R 2 | P - K R 4 |
The idea, as will be seen very soon, is to play P - R 5 in order to fix White's King's side Pawns with a view to the future. It is evident to Black that White wants to bring his King to Q Kt 3 to support his two weak isolated Pawns, and thus to free his Rooks. Black, therefore, makes a plan to shift the attack to the King's side at the proper time, in order to obtain some advantage from the greater mobility of his Rooks.
| 4. R - Q 1 | R (Q 4) - Q R 4 |
in order to force the Rook to Rook's square, keeping both Rooks tied up.
| 5. R (Q 1) - R 1 | P - R 5 | |
| 6. K - Q 2 | K - Kt 2 | |
| 7. K - B 2 | R - K Kt 4 |
Black begins to transfer his attack to the King's side.
| 8. R - K Kt 1 |
A serious mistake, which loses quickly. White should have played 8 K - Kt 3, when Black would have answered 8...R (R 5) - R 4; 9 P - B 3, and Black would have obtained an opening at K Kt 6 for his King, which in the end might give him the victory.
| 8. ........ | R - K B 5 |
Now the King cannot go to Kt 3, because of R - Kt 4 ch.
| 9. K - Q 3 | R - B 6 ch | |
| 10. K - K 2 |
If P × R, R × R; followed by R - K R 8 winning,
| 10. ........ | R × R P |
and Black won after a few moves.
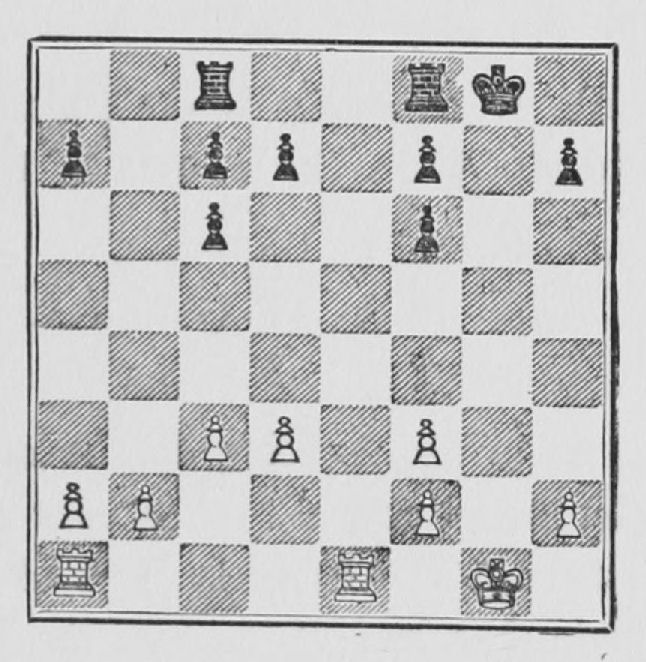
Example 57.—Another good example, in which is shown the advantage of the greater mobility of the pieces in an ending, is the following from a game Capablanca-Kupchick played at the Havana Masters Tournament, 1913. The full score and notes of the game can be found in the book of the tournament.
White's only advantage in the above position is that he possesses the open file and has the move, which will secure him the initiative. There is also the slight advantage of having his Pawns on the Queen's side united, while Black has an isolated Q R P. The proper course, as in the previous ending, is to bring the Rooks forward, so that at least one of them may be able to shift from one side of the board to the other, and thus keep Black's Rooks from moving freely. What this means in general theory has been stated already; it really means: keep harassing the enemy; force him to use his big pieces to defend Pawns. If he has a weak point, try to make it weaker, or create another weakness somewhere else and his position will collapse sooner or later. If he has a weakness, and he can get rid of it, make sure that you create another weakness somewhere else.
From the position in question the game continued thus:
| 1. R - K 4 | K R - K 1 |
with the object of repeating White's manœuvre, and also not to allow White the control of the open file.
| 2. Q R - K 1 | R - K 3 | |
| 3. Q R - K 3 | R (B 1) - K 1 | |
| 4. K - B 1 | K - B 1 |
Black wants to bring his King to the centre of the board in order to be nearer to whatever point White decides to attack. The move is justified at least on the general rule that in such endings the King should be in the middle of the board. He does nothing after all but follow White's footsteps. Besides, it is hard to point out anything better. If 4...P - Q 4; 5 R - Kt 4 ch, followed by K - K 2, would leave Black in a very disagreeable position. If 4...P - K B 4; 5 R - Q 4! R × R? 6 P × R, R × P; 7 K - B 2, R - K 2; 8 R - Q R 4, winning the Q R P, which would practically leave White with a passed Pawn ahead on the Queen's side, as the three Pawns of Black on the King's side would be held by the two of White.
| 5. K - K 2 | K - K 2 | |
| 6. R - Q R 4 | R - Q R 1 |
The student should note that through the same manœuvre Black is forced into a position similar to the one shown in the previous ending.
| 7. R - R 5! |
This move has a manifold object. It practically fixes all of Black's Pawns except the Q P, which is the only one that can advance two squares. It specially prevents the advance of Black's K B Pawns, and at the same time threatens the advance of White's K B Pawns to B 4 and B 5. By this threat it practically forces Black to play P - Q 4, which is all White desires, for reasons that will soon become evident.
| 7. ........ | P - Q 4 | |
| 8. P - Q B 4! | K - Q 3 |
Evidently forced, as the only other move to save a Pawn would have been P × P, which would have left all Black's Pawns isolated and weak. If 8...P - Q 5; 9 R - K 4, K - Q 3; 10 P - Q Kt 4! R - K 4; 11 R - R 6, and Black's game is hopeless.
| 9. P - B 5 ch | K - Q 2 | |
| 10. P - Q 4 | P - B 4 |
Apparently very strong, since it forces the exchange of Rooks because of the threat R - R 3; but in reality it leads to nothing. The best chance was to play R - K K 1.
| 11. R × R | P × R | |
| 12. P - B 4 |
Up to now White had played with finesse, but this last move is weak. R - R 6 was the proper way to continue, so as to force Black to give up his Q R P or Q B P.
| 12. ........ | K - B 1 | |
| 13. K - Q 2 |
Again a bad move. 13 R - R 3 was the proper continuation, and if then 13...R - Kt 1; 14 P - Kt 3, K - Kt 2; 15 P - Kt 4, K - R 1; 16 R - Q Kt 3, with excellent winning chances; in fact, I believe, a won game.
| 13. ........ | K - Kt 2 |
Black misses his only chance. R - Kt 1 would have drawn.
| 14. R - R 3 | R - K Kt 1 | |
| 15. R - R 3 | R - Kt 2 | |
| 16. K - K 2 | K - R 3 | |
| 17. R - R 6 | R - K 2 | |
| 18. K - Q 3 | K - Kt 2 |
He goes back with the King to support his K P, and thus be able to utilise his Rook. It is, however, useless, and only White's weak play later on gives him further chances of a draw.
| 19. P - K R 4 | K - B 1 | |
| 20. R - R 5 |
To prevent the Black Rook from controlling the open file
| 20. ........ | K - Q 2 | |
| 21. R - Kt 5 | R - B 2 | |
| 22. K - B 3 | K - B 1 |
He must keep his King on that side because White threatens to march with his King to R 6 via Kt 4.
| 23. K - Kt 4 | R - B 3 | |
| 24. K - R 5 | K - Kt 2 | |
| 25. P - R 4 | P - Q R 3 | |
| 26. P - R 5 | R - R 3 |
He can do nothing but wait for White. The text move stops White from moving his Rook, but only for one move.
| 27. P - Kt 4 | R - B 3 |
The only other move was K - R 2; when White could play R - Kt 7, or even P - Kt 5.
| 28. P - Kt 5 |
A weak move, which gives Black a fighting chance. In this ending, as is often the case with most players, White plays the best moves whenever the situation is difficult and requires careful handling, but once his position seems to be overwhelming he relaxes his efforts and the result is nothing to be proud of. The right move was 28 R - Kt 7.
| 28. ........ | R P × P | |
| 29. P × P | R - B 1 ! | |
| 30. R - Kt 7 | R - R 1 ch | |
| 31. K - Kt 4 | P × P | |
| 32. K × P | R - R 7 | |
| 33. P - B 6 ch | K - Kt 1 | |
| 34. R × R P | R - Kt 7 ch | |
| 35. K - R 5 | R - R 7 ch | |
| 36. K - Kt 4 | R × P |
Black misses his last chance: R - Kt 7 ch, forcing the King to B 3, in order to avoid the perpetual, would probably draw. The reader must bear in mind that my opponent was then a very young and inexperienced player, and consequently deserves a great deal of credit for the fight he put up.
| 37. R - K 7 | R × P |
R - Kt 7 ch; followed by R - K R 7, offered better chances.
| 38. P - R 6! | R × P ch | |
| 39. K - Kt 5 | R - Q 8 | |
| 40. P - R 7 | R - Kt 8 ch | |
| 41. K - B 5 | R - B 8 ch | |
| 42. K - Q 4 | R - Q 8 ch | |
| 43. K - K 5 | R - K 8 ch | |
| 44. K - B 6 | R - K R 8 | |
| 45. R - K 8 ch | K - R 2 | |
| 46. P - R 8 (Q) | R × Q | |
| 47. R × R | K - Kt 3 | |
| 48. K × P | K × P | |
| 49. K × P | K - B 4 | |
| 50. K - K 5 | Resigns. |
This ending shows how easy it is to make weak moves, and how often, even in master-play, mistakes are made and opportunities are lost. It shows that, so long as there is no great advantage of material, even with a good position, a player, no matter how strong, cannot afford to relax his attention even for one move.
27. THE DANGER OF A SAFE POSITION
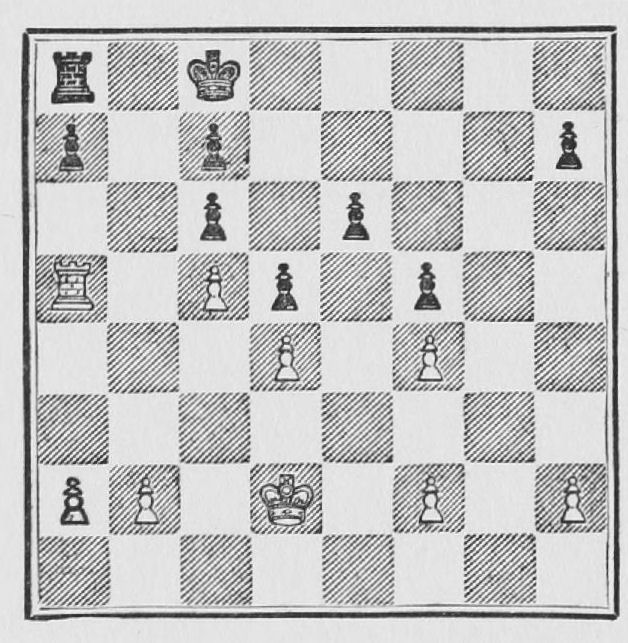
Example 58.—A good proof of the previous statement is shown in the following ending between Marshall and Kupchick in one of their two games in the same Tournament (Havana, 1913).
