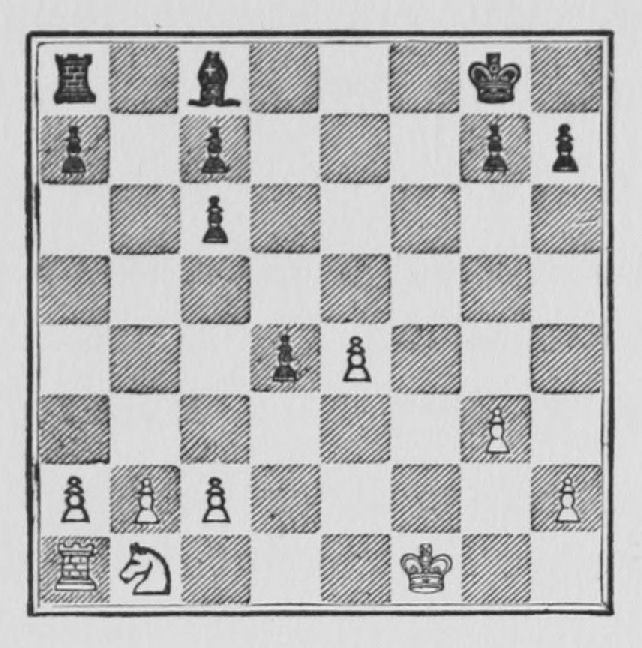
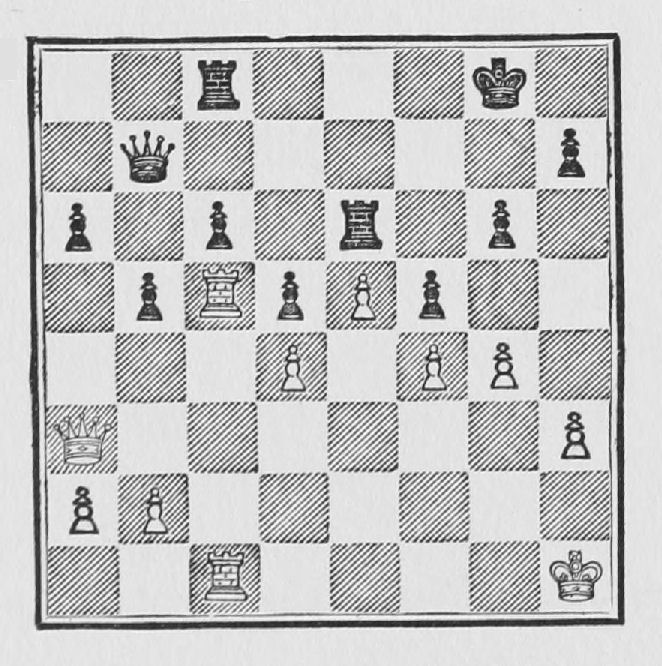
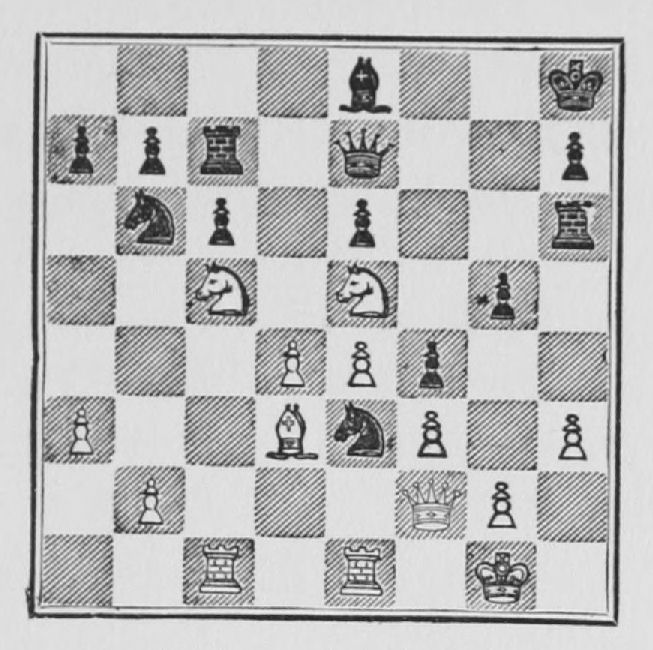
In this position it is Black's move. To a beginner the position may look like a draw, but the advanced player will realise immediately that there are great possibilities for Black to win, not only because he has the initiative, but because of White's undeveloped Queen's side and the fact that a Bishop in such a position is better than a Knight (see Section 14). It will take some time for White to bring his Rook and Knight into the fray, and Black can utilise it to obtain an advantage. There are two courses open to him. The most evident, and the one that most players would take, is to advance the Pawn to Q B 4 and Q B 5 immediately in conjunction with the Bishop check at R 3 and any other move that might be necessary with the Black Rook. The other, and more subtle, course was taken by Black. It consists in utilising his Rook in the same way as shown in the previous endings, forcing White to defend something all the time, restricting the action of White's Knight and White's Rook, while at the same time keeping freedom of action for his own Rook and Bishop.
| 1. ........ | R - Kt 1 |
This forces P - Q Kt 3, which blocks that square for the White Knight.
| 2. P - Kt 3 | R - Kt 4 |
bringing the Rook to attack the King's side Pawns so as to force the King to that side to defend them, and thus indirectly making more secure the position of Black's Queen's side Pawns.
| 3. P - B 4 | R - K R 4 | |
| 4. K - Kt 1 | P - B 4 |
Note that the White Knight's sphere of action is very limited, and that after Kt - Q 2 White's own Pawns are in his way.
| 5. Kt - Q 2 | K - B 2 | |
| 6. R - B 1 ch |
This check accomplishes nothing. It merely drives Black's King where it wants to go. Consequently it is a very bad move. P - Q R 3 at once was the best move.
| 6. ........ | K - K 2 | |
| 7. P - Q R 3 | R - R 3 |
Getting ready to shift the attack to the Queen's side, where he has the advantage in material and position.
| 8. P - K R 4 | R - R 3 |
Notice how similar are the manœuvres with this Rook to those seen in the previous endings.
| 9. R - R 1 | B - Kt 5 |
Paralysing the action of the Knight and fixing the whole King's side.
| 10. K - B 2 | K - K 3 |
White cannot answer Kt - B 3, because B × Kt followed by K - K 4 will win a Pawn, on account of the check at K B 3 which cannot be stopped.
| 11. P - R 4 | K - K 4 | |
| 12. K - Kt 2 | R - K B 3 | |
| 13. R - K 1 | P - Q 6 | |
| 14. R - K B 1 | K - Q 5 |
Now the King attacks White's Pawns and all will soon be over.
| 15. R × R | P × R | |
| 16. K - B 2 | P - B 3 |
Merely to exhaust White's move, which will finally force him to move either the King or the Knight.
The quickest way to win. White should resign.
| 28. Kt - Q 6 | P - B 4 | |
| 29. P - Kt 4 | P × P | |
| 30. P - B 5 | P - Kt 6 | |
| 31. Kt - B 4 | K - Kt 6 | |
| 32. Kt - K 3 | P - Kt 7 | |
| Resigns. |
A very good example on Black's part of how to conduct such an ending.
CHAPTER VI
Further Openings and Middle-Games
31. SOME SALIENT POINTS ABOUT PAWNS
Before going back to the discussion of openings and middle-game positions, it might be well to bear in mind a few facts concerning Pawn positions which will no doubt help to understand certain moves, and sometimes even the object of certain variations in the openings, and of some manœuvres in the middle-games.
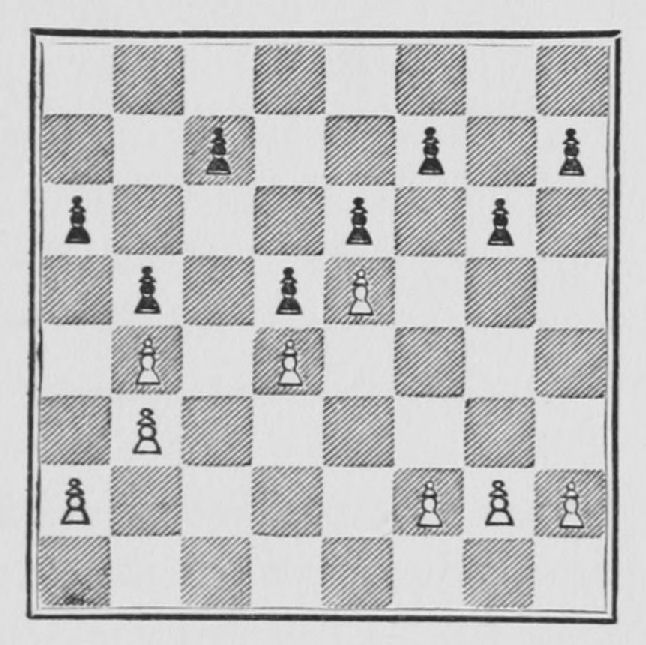
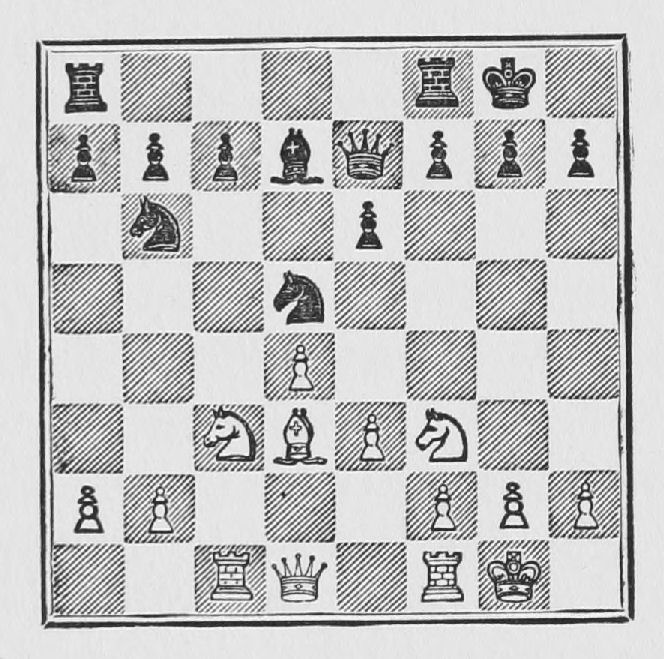
Example 63.—In the position of the diagram we have an exceedingly bad Pawn formation on Black's side. Black's Q B P is altogether backward, and White could by means of the open file concentrate his forces against that weak point. There is also the square at White's Q B 5, which is controlled by White, and from where a White piece once established could not be dislodged. In order to get rid of it, Black would have to exchange it, which is not always an easy matter, and often when possible not at all convenient. The same holds true with regard to Black's K P, K B P and K Kt P, which create what is called a "hole" at Black's K B 3. Such Pawn formations invariably lead to disaster, and consequently must be avoided.
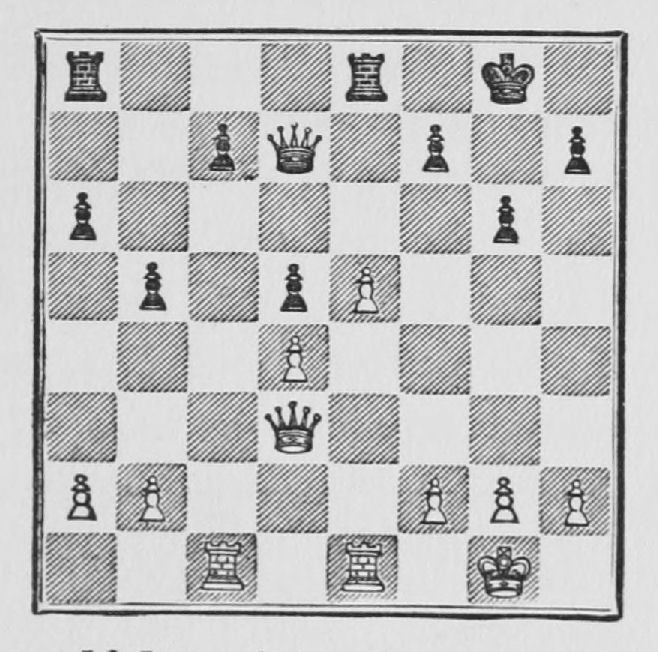
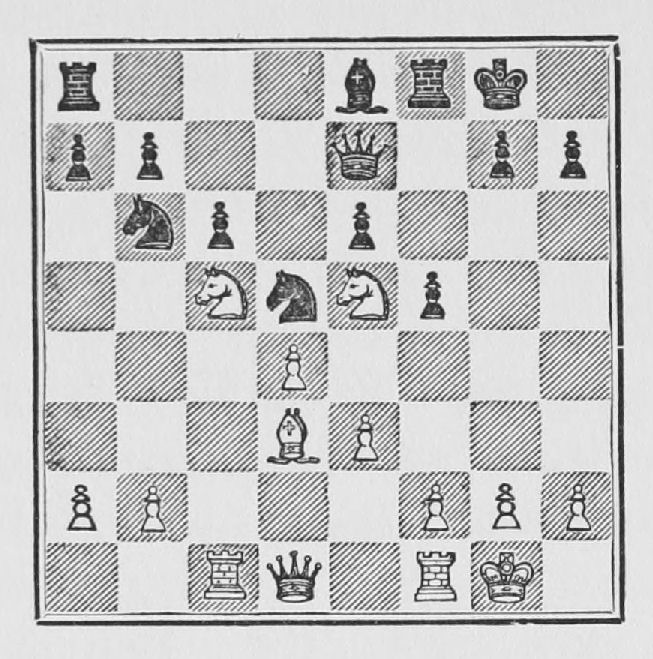
Example 64.—In this position we might say that the White centre Pawns have the attacking position, while the Black centre Pawns have the defensive position. Such a formation of Pawn occurs in the French Defence. In such positions White most often attempts, by means of P - K B 4 and K B 5, to obtain a crushing attack against Black's King, which is generally Castled on the King's side. To prevent that, and also to assume the initiative or obtain material advantage, Black makes a counter-demonstration by P - Q B 4, followed by P × P (when White defends the Pawn by P - Q B 3), and the concentrating of Black's pieces against the White Pawn at Q 4. This in substance might be said to be a determined attack against White's centre in order to paralyse the direct attack of White against Black's King. It must be remembered that at the beginning of the book it was stated that control of the centre was an essential condition to a successful attack against the King.
In an abstract way we may say that two or more Pawns are strongest when they are in the same rank next to one another. Thus the centre Pawns are strongest in themselves, so to speak, when placed at K 4 and Q 4 respectively, hence the question of advancing either the one or the other to the fifth rank is one that must be most carefully considered. The advance of either Pawn often determines the course the game will follow.
Another thing to be considered is the matter of one or more passed Pawns when they are isolated either singly or in pairs. We might say that a passed Pawn is either very weak or very strong, and that its weakness or strength, whichever happens to be in the case to be considered, increases as it advances, and is at the same time in direct relation to the number of pieces on the board. In this last respect it might be generally said that a passed Pawn increases in strength as the number of pieces on the board diminishes.
Having all this clear in mind we will now revert to the openings and middle-game. We will analyse games carefully from beginning to end according to general principles. I shall, whenever possible, use my own games, not because they will better illustrate the point, but because, knowing them thoroughly, I shall be able to explain them more authoritatively than the games of others.
32. SOME POSSIBLE DEVELOPMENTS FROM A RUY LOPEZ
That some of the variations in the openings and the manœuvres in the middle-game are often based on some of the elementary principles just expounded can be easily seen in the following case:
Example 65.
| 1. P - K 4 | P - K 4 | |
| 2. Kt - K B 3 | Kt - Q B 3 | |
| 3. B - Kt 5 | P - Q R 3 | |
| 4. B - R 4 | Kt - B 3 | |
| 5. O - O | Kt × P | |
| 6. P - Q 4 | P - Q Kt 4 | |
| 7. B - Kt 3 | P - Q 4 | |
| 8. P × P | B - K 3 | |
| 9. P - B 3 | B - K 2 | |
| 10. R - K 1 | Kt - B 4 | |
| 11. B - B 2 | B - Kt 5 | |
| 12. Q Kt - Q 2 | O - O | |
| 13. Kt - Kt 3 | Kt - K 3 |
So far a very well-known variation of the Ruy Lopez. In fact, they are the moves of the Janowski-Lasker game in Paris, 1912.
| 14. Q - Q 3 | P - Kt 3 |
Let us suppose the game went on, and that in some way White, by playing one of the Knights to Q 4 at the proper time, forced the exchange of both Knights, and then afterwards both the Bishops were exchanged, and we arrived at some such position as shown in the following diagram. (I obtained such a position in a very similar way once at Lodz in Poland. I was playing the White pieces against a consulting team headed by Salwe.)
Now we would have here the case of the backward Q B P, which will in no way be able to advance to Q B 4. Such a position may be said to be theoretically lost, and in practice a first-class master will invariably win it from Black. (If I may be excused the reference, I will say that I won the game above referred to.)
After a few moves the position may be easily thus:
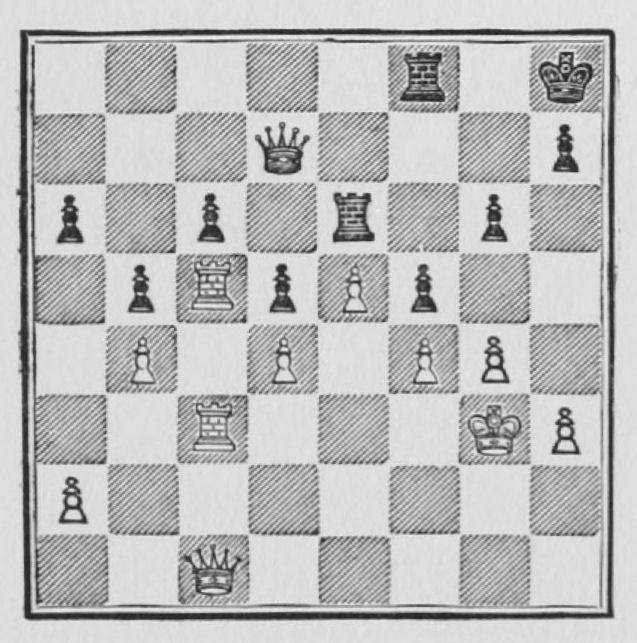
The Black pieces can be said to be fixed. If White plays Q - Q B 3, Black must answer Q - Q 2, otherwise he will lose a Pawn, and if White returns with the Queen to Q R 3 Black will have again to return to Q Kt 2 with the Queen or lose a Pawn. Thus Black can only move according to White's lead, and under such conditions White can easily advance with his Pawns to K B 4 and K Kt 4, until Black will be forced to stop P - B 5 by playing P - K B 4, and we might finally have some such position as this:
Example 66.
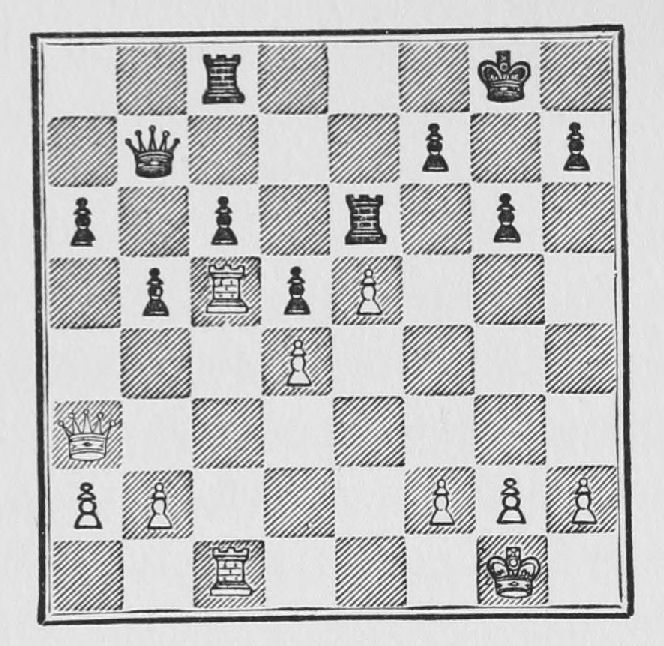
In this situation the game might go on as follows:
1. P × P, P × P; 2. Q - K B 3, Q - Q 2
White threatened to win a Pawn by Q × P, and Black could not play 2...R - K B 1, because 3 R × B P would also win a Pawn at least.
| 3. R (B 5) - B 2, | R - Kt 3; | ||
| 4. R - Kt 2, | K - R 1; | ||
| 5. R (B 1) - K Kt 1, | R (B 1) - K Kt 1; | ||
| 6. Q - R 5, | R × R; | ||
| 7. R × R, | R × R; | ||
| 8. K × R, | Q - Kt 2 ch; | ||
| 9. K - R 2, | Q - Kt 3; | ||
| 10. Q × Q, | P × Q; | ||
| 11. P - Kt 4, and White wins. | |||
Now suppose that in the position in the preceding diagram it were Black's move, and he played R - K B 1. White would then simply defend his K B P by some move like Q - K B 3, threatening R × Q B P, and then he would bring his King up to Kt 3, and when the time came, break through, as in the previous case. White might even be able to obtain the following position:
Black would now be forced to play R - B 1, and White could then play Q - B 2, and follow it up with K B 3, and thus force Black to play P × P, which would give White a greater advantage.
A careful examination of all these positions will reveal that, besides the advantage of freedom of manœuvre on White's part, the power of the Pawn at K 5 is enormous, and that it is the commanding position of this Pawn, and the fact that it is free to advance, once all the pieces are exchanged, that constitute the pivot of all White's manœuvres.
I have purposely given positions without the moves which lead to them so that the student may become accustomed to build up in his own mind possible positions that may arise (out of any given situation). Thus he will learn to make strategical plans and be on his way to the master class. The student can derive enormous benefit by further practice of this kind.
33. THE INFLUENCE OF A "HOLE"
The influence of a so-called "hole" in a game has already been illustrated in my game against Blanco (page 81), where has been shown the influence exercised by the different pieces posted in the hole created at White's K 5.
Example 67.—In order to further illustrate this point, I now give a game played in the Havana International Masters Tournament of 1913. (Queen's Gambit Declined.) White: D. Janowski. Black: A. Kupchick.
| 1. P - Q 4 | P - Q 4 | |
| 2. P - Q B 4 | P - K 3 | |
| 3. Kt - Q B 3 | Kt - K B 3 | |
| 4. B - Kt 5 | B - K 2 | |
| 5. P - K 3 | Q Kt - Q 2 | |
| 6. B - Q 3 | P × P | |
| 7. B × P | Kt - Kt 3 |
Of course the idea is to post a Knight at Q 4, but as it is the other Knight which will be posted there this manœuvre does not seem logical. The Knight at Kt 3 does nothing except to prevent the development of his own Q B. The normal course O - O, followed by P - Q B 4, is more reasonable. For a beautiful illustration of how to play White in that variation, see the Janowski-Rubinstein game of the St. Petersburg Tournament of 1914.
| 8. B - Q 3 |
B - Kt 3 has some points in its favour in this position, the most important being the possibility of advancing the King's Pawn immediately after 8. ... K Kt - Q 4; 9 B × B, Q × B.
| 8. ........ | K Kt - Q 4 | |
| 9. B × B | Q × B | |
| 10. Kt - B 3 |
Had White's Bishop been at Q Kt 3 he could now play P - K 4 as indicated in the previous note, a move which he cannot make in the present position, because of Kt - K B 5 threatening, not only the K Kt P, but also Kt × B ch. As White's King's Bishop should never be exchanged in this opening without a very good reason White therefore cannot play P - K 4.
| 10. ........ | O - O | |
| 11. O - O | B - Q 2 | |
| 12. R - B 1 |
White is perfectly developed, and now threatens to win a Pawn as follows: Kt × Kt, Kt × Kt; P - K 4, followed by R × P.
| 12. ........ | P - Q B 3 |
The fact that Black is practically forced to make this move in order to avoid the loss of a Pawn is sufficient reason in itself to condemn the whole system of development on Black's part. In effect, he plays B - Q 2 and now he has to shut off the action of his own Bishop, which thereby becomes little more than a Pawn for a while. In fact, it is hard to see how this Bishop will ever be able to attack anything. Besides, it can be easily seen that White will soon post his two Knights at K 5 and Q B 5 respectively, and that Black will not be able to dislodge them without seriously weakening his game, if he can do it at all. From all these reasons it can be gathered that it would probably have been better for Black to play Kt × Kt and thus get rid of one of the two White Knights before assuming such a defensive position. In such cases, the less the number of pieces on the board, the better chances there are to escape.
| 13. Kt - K 4 | P - K B 4 |
This practically amounts to committing suicide, since it creates a hole at K 5 for White's Knight, from where it will be practically impossible to dislodge him. If Black intended to make such a move he should have done it before, when at least there would have been an object in preventing the White Knight from reaching B 5.
| 14. Kt - B 5 | B - K 1 | |
| 15. Kt - K 5 |
The position of White's Knights, especially the one at K 5, might be said to be ideal, and a single glance shows how they dominate the position. The question henceforth will be how is White going to derive the full benefit from such an advantageous situation, This we shall soon see.
| 15. ........ | R - Kt 1 |
There is no object in this move, unless it is to be followed by Kt - Q 2. As that is not the case, he might have gone with the Rook to B 1, as he does later.
| 16. R - K 1 | R - B 3 | |
| 17. Q - B 3 | R - R 3 | |
| 18. Q - Kt 3 | R - B 1 |
White threatened to win the exchange by playing either Kt - B 7 or Kt - Kt 4.
| 19. P - B 3 | R - B 2 | |
| 20. P - Q R 3 | K - R 1 | |
| 21. P - R 3 |
Perhaps all these precautions are unnecessary, but White feels that he has more than enough time to prepare his attack, and wants to be secure in every way before he begins.
| 21. ........ | P - Kt 4 | |
| 22. P - K 4 | P - B 5 | |
| 23. Q - B 2 | Kt - K 6 |
He had better have played Kt - B 3; and tried later on to get rid of White's Knights by means of Kt - Q 2.
| 24. R × Kt |
with this sacrifice of the Rook for a Knight and Pawn White obtains an overwhelming position.
| 24. ........ | P × R | |
| 25. Q × P | Kt - B 1 |
Kt - Q 2 was better in order to get rid of one of the two White Knights. There were, however, any number of good replies to it, among them the following: Kt (B 5) × Kt, B × Kt; Q × P, Q × Q; Kt - B 7 ch, K - Kt 2; Kt × Q, and with two Pawns for the exchange, and the position so much in his favour, White should have no trouble in winning.
| 26. Kt - Kt 4 | R - Kt 3 | |
| 27. P - K 5 | R - Kt 2 | |
| 28. B - B 4 | B - B 2 |
All these moves are practically forced, and as it is easily seen they tie up Black's position more and more. White's manœuvres from move 24 onwards are highly instructive.
| 29. Kt - B 6 | Kt - Kt 3 |
This wandering Knight has done nothing throughout the game.
| 30. Kt (B5) - K 4 | P - K R 3 | |
| 31. P - K R 4 | Kt - Q 4 | |
| 32. Q - Q 2 | R - Kt 3 | |
| 33. P × P | Q - B 1 |
If P × P; K - B 2, and Black would be helpless.
| 34. P - B 4 | Kt - K 2 | |
| 35. P - K Kt 4 | P × P | |
| 36. P × P | Resigns. |
There is nothing to be done. If B - Kt 1; Q - R 2 ch, K - Kt 2; B × P.
The student should notice that, apart from other things, White throughout the game has had control of the Black squares, principally those at K 5 and Q B 5.
From now on to the end of the book I shall give a collection of my games both lost and won, chosen so as to serve as illustrations of the general principles laid down in the foregoing pages.
PART II
GAME 1. QUEEN'S GAMBIT DECLINED
(Match, 1909)
White: F. J. Marshall. Black: J. R. Capablanca.
| 1. P - Q 4 | P - Q 4 | |
| 2. P - Q B 4 | P - K 3 | |
| 3. Kt - Q B 3 | Kt - K B 3 | |
| 4. B - Kt 5 | B - K 2 | |
| 5. P - K 3 | Kt - K 5 |
I had played this defence twice before in the match with good results, and although I lost this game I still played it until the very last game, when I changed my tactics. The reason was my total lack of knowledge of the different variations in this opening, coupled with the fact that I knew that Dr. E. Lasker had been successful with it against Marshall himself in 1907. I thought that since Dr. Lasker had played it so often, it should be good. The object is to exchange a couple of pieces and at the same time to bring about a position full of possibilities and with promising chances of success once the end-game stage is reached. On general principles it should be wrong, because the same Knight is moved three times in the opening, although it involves the exchange of two pieces. In reality the difficulty in this variation, as well as in nearly all the variations of the Queen's gambit, lies in the slow development of Black's Queen Bishop. However, whether this variation can or cannot be safely played is a question still to be decided, and it is outside the scope of this book. I may add that at present my preference is for a different system of development, but it is not unlikely that I should some time come back to this variation.
| 6. B × B | Q × B | |
| 7. B - Q 3 |
P × P is preferable for reasons that we shall soon see.
| 7. ........ | Kt × Kt | |
| 8. P × Kt | Kt - Q 2 |
Now P × P would be a better way to develop the game. The idea is that after 8...P × P; 9 B × B P, P - Q Kt 3, followed by B - Kt 2, would give Black's Bishop a powerful range. For this variation see the eleventh game of the match.
| 9. Kt - B 3 | O - O |
No longer would 9...P × P; 10 B × P, P - Q Kt 3 be good, because 11 B - Kt 5 would prevent B - Kt 2 on account of Kt - K 5.
| 10. P × P | P × P | |
| 11. Q - Kt 3 | Kt - B 3 | |
| 12. P - Q R 4 | P - B 4 |
Played with the intention of obtaining the majority of Pawns on the Queen's side. Yet it is doubtful whether this move is good, since it leaves Black's Queen's-side Pawns disrupted in a way. The safer course would have been to play P - B 3.
| 13. Q - R 3 | P - Q Kt 3 |
